


Photoshop is a great tool to work with both vector and pixel shapes. In this tutorial we will demonstrate a powerful combination of vector shapes, layer styles, and manual drawing to create a photorealistic camera. So realistic you’ll think it’s just an ordinary photo.
Final Image Preview
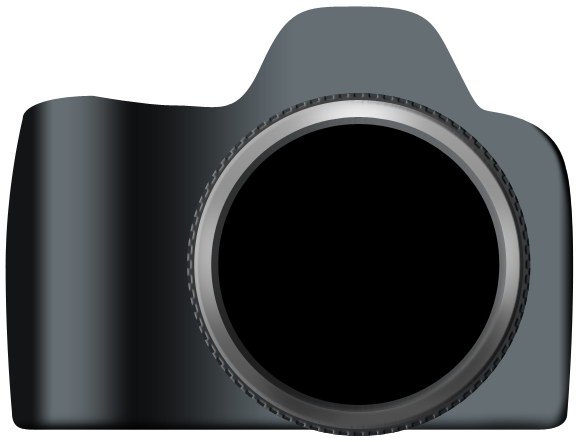
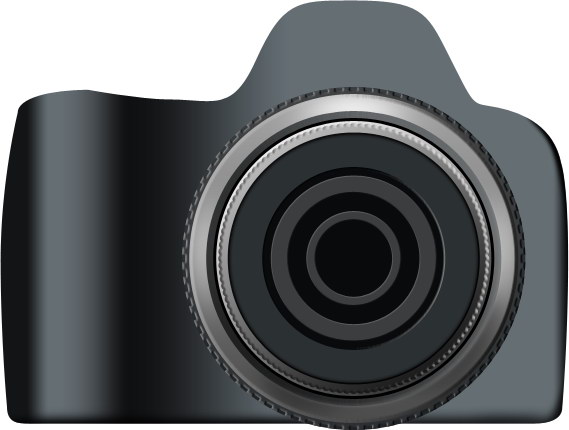
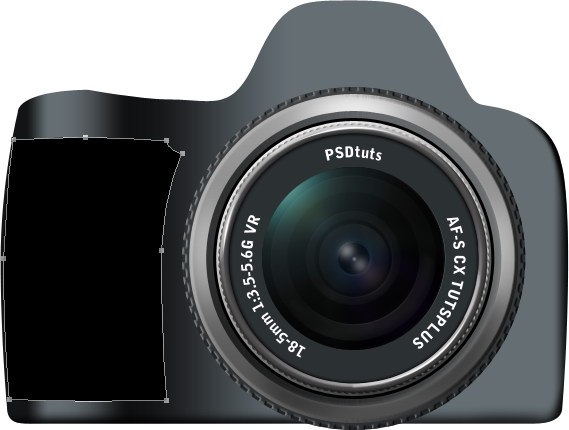
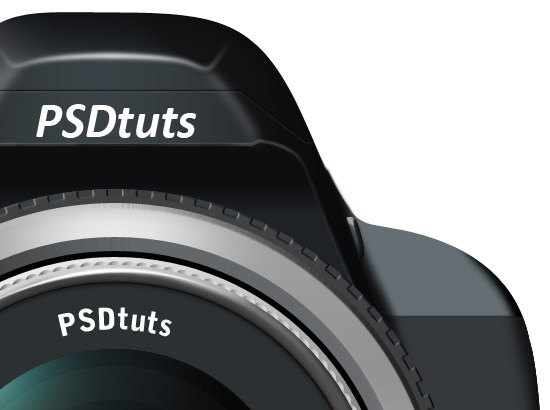
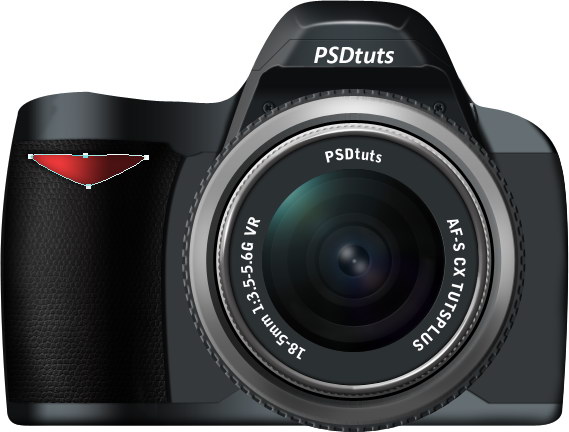
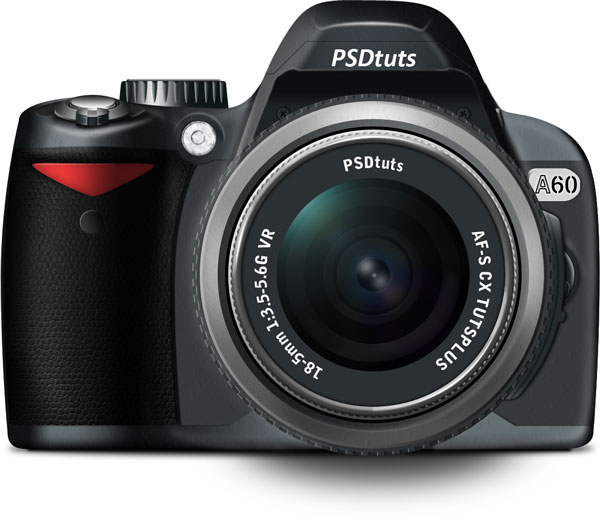
Let’s take a look at the image we’ll be creating. Want access to the full PSD files and downloadable copies of every tutorial, including this one? Join PSDTUTS PLUS for just $9/month. You can view the final image preview below. Click here to see it in full size.

Step 1
Our first step is do some research. This camera is based on a Nikon D-60 so go ahead try to search for any reference material you can find. If you have this camera, put it beside you. If you don’t, try Google image, eBay, or Nikon’s official page to search for an image.
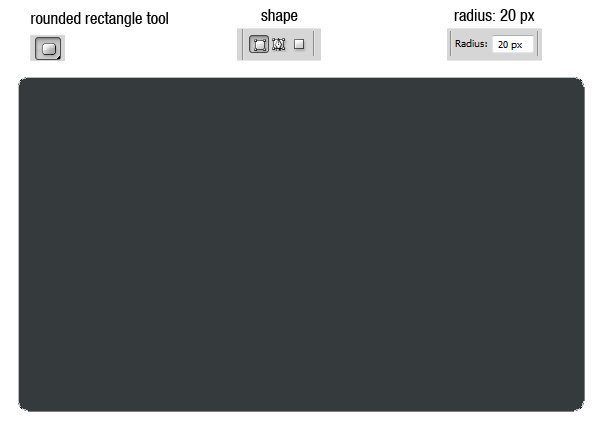
In Photoshop, we’ll start by creating the camera’s main body. Usually, it’s easier to start by creating a basic shape and then edit it from there. Use the rounded rectangle tool with a radius of 20 px, select the shape in the option bar. Create a rectangle with color #353a3d.
Step 2
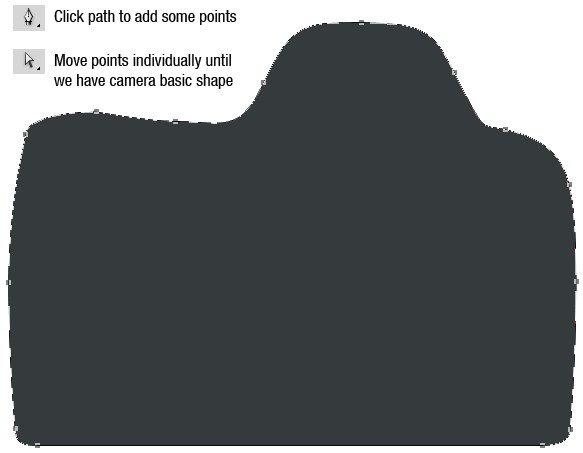
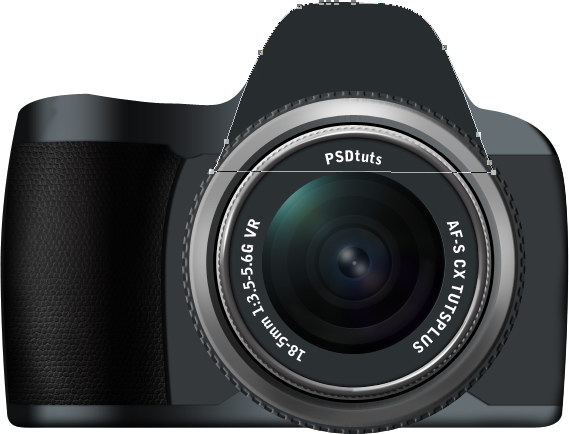
Choose the Pen Tool and click on the path to add more points. Move each point individually using the Direct Selection tool until you have the basic camera shape.
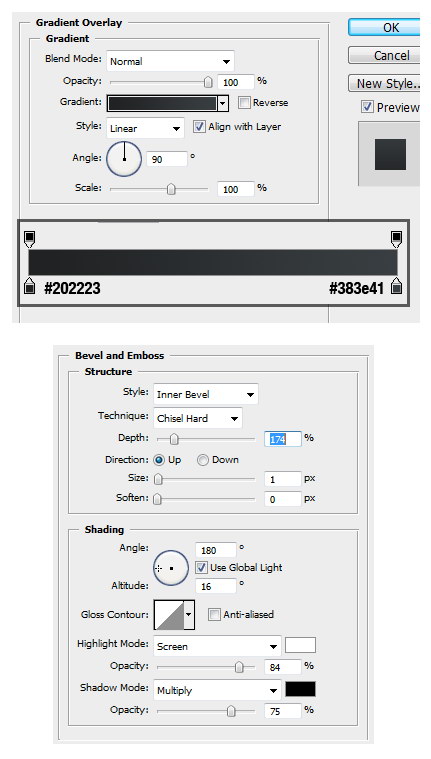
Step 3
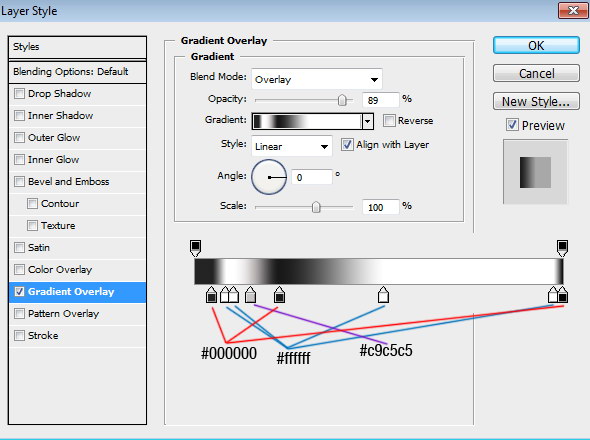
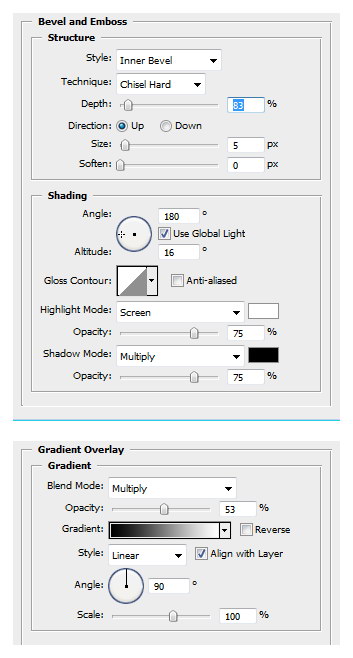
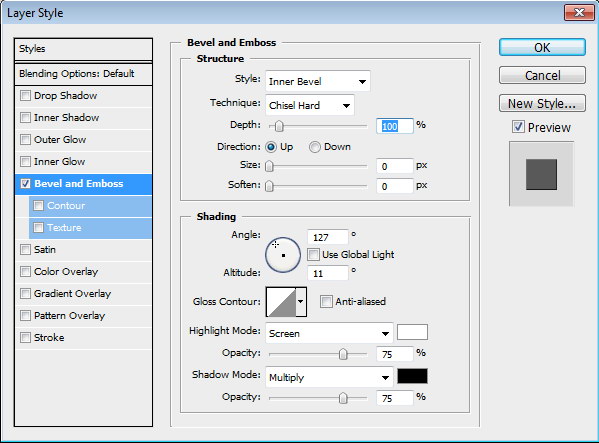
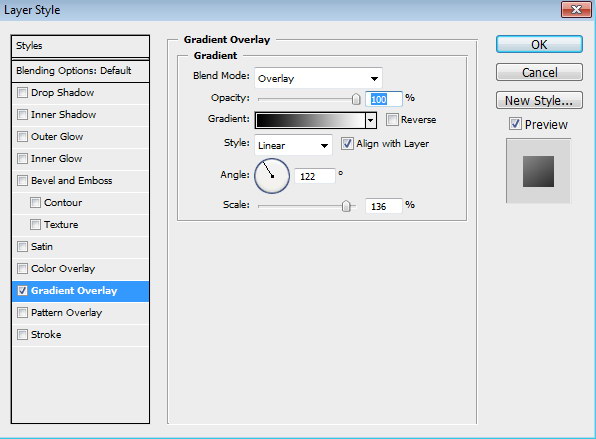
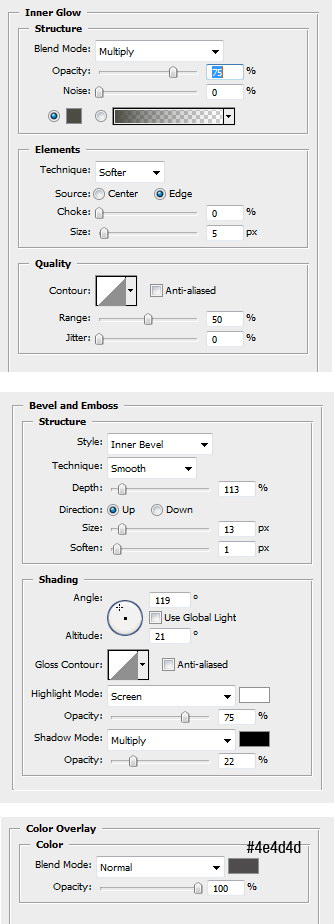
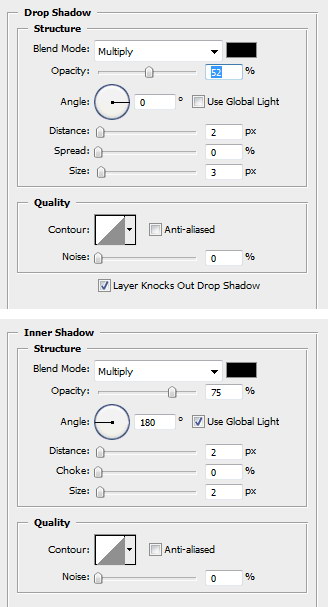
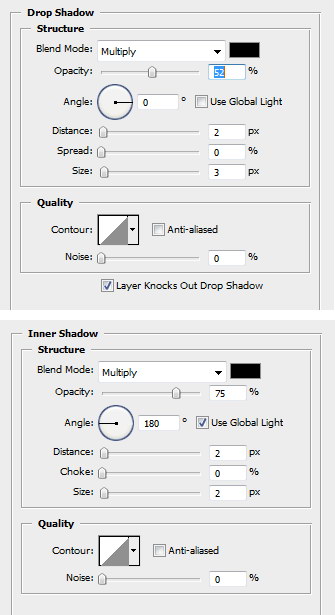
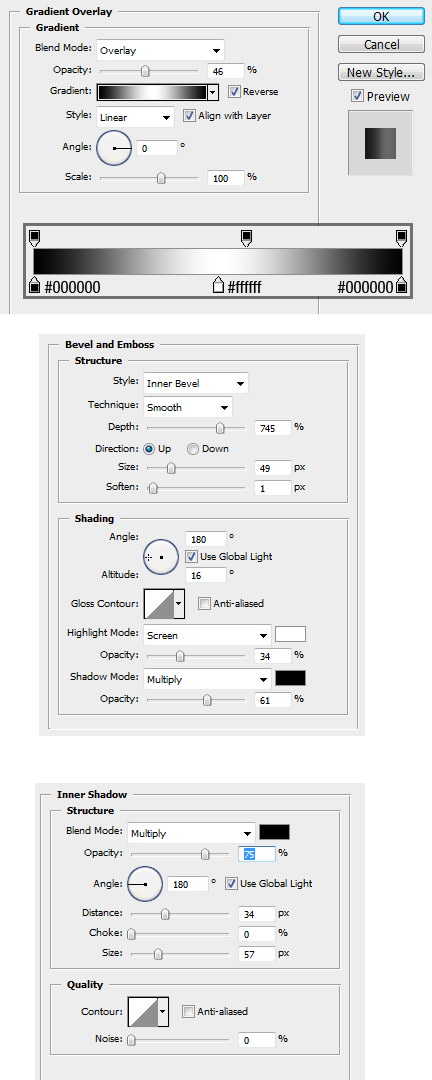
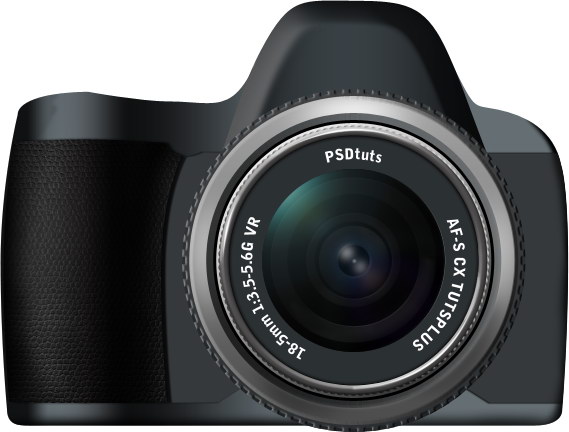
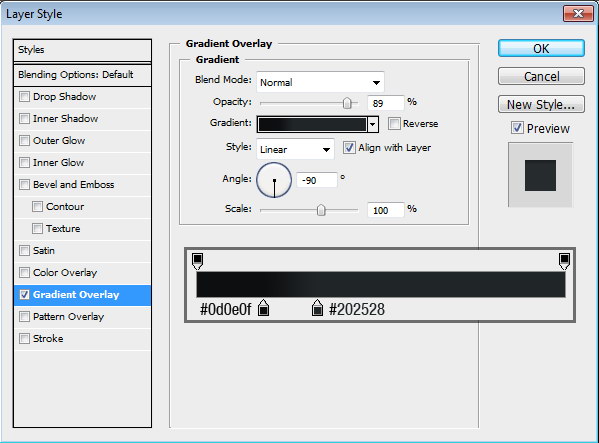
Double click the shape layer and add this layer style.
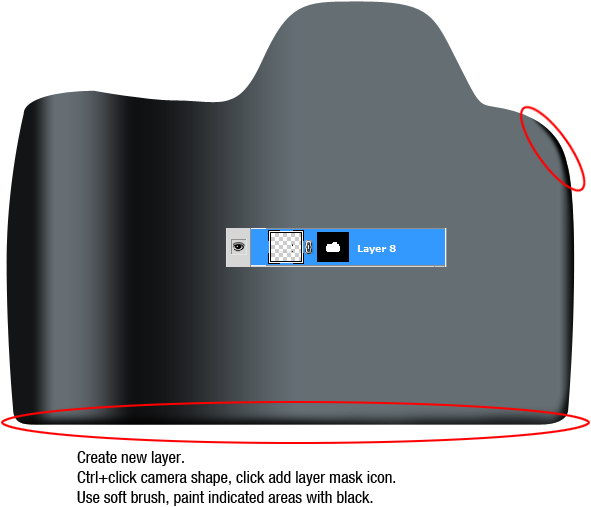
Step 4
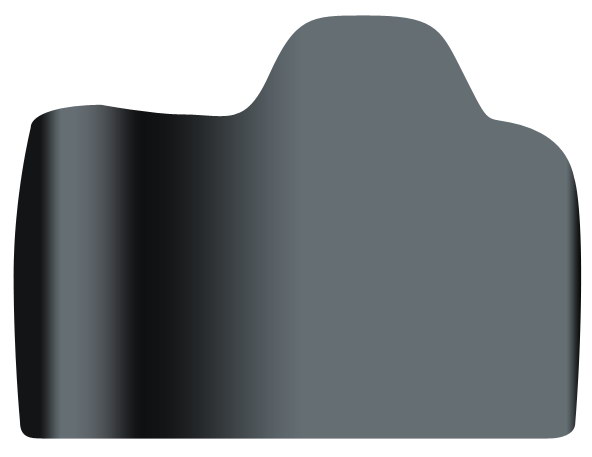
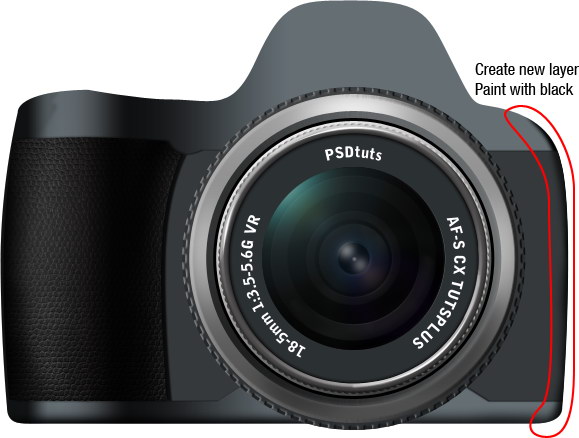
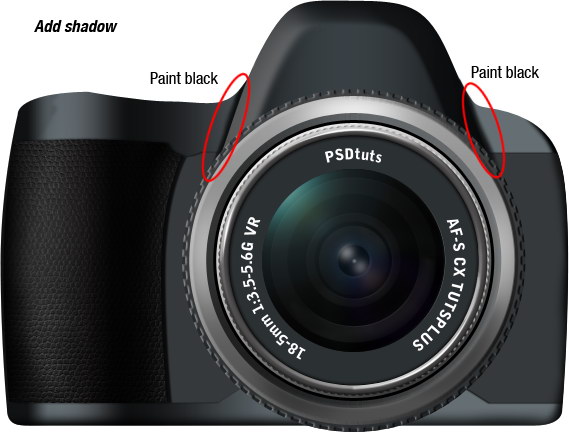
Sometimes layer styles are just not enough to create the effect. To fix it, we need to manually draw with brush tool. Create new layer, Cmd-click camera shape and click Add Layer Mask icon. Use a soft brush and paint black in the indicated areas.
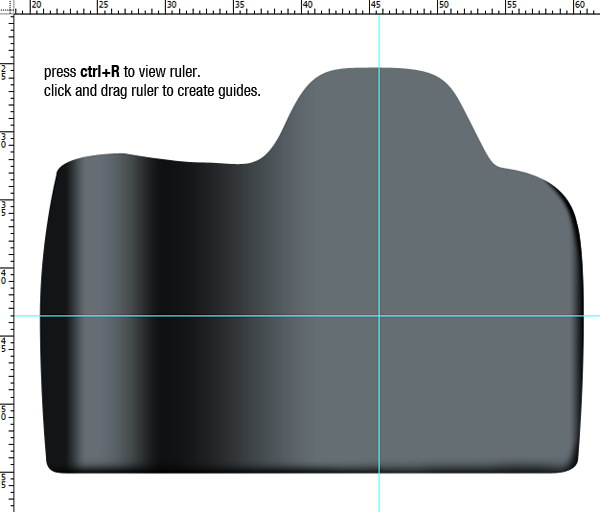
Step 5
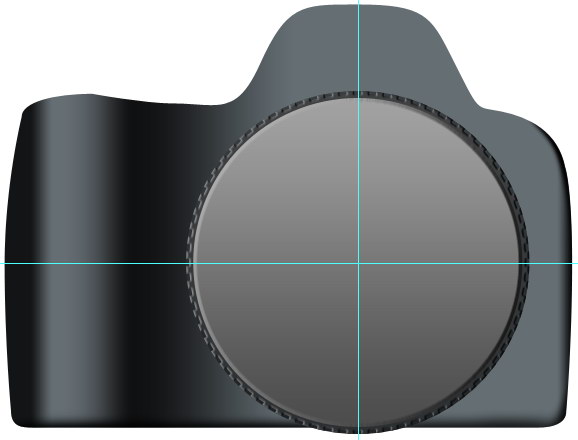
Now let’s create the lens. Open your Ruler by pressing Cmd + R. Click and drag to create center of the lens.
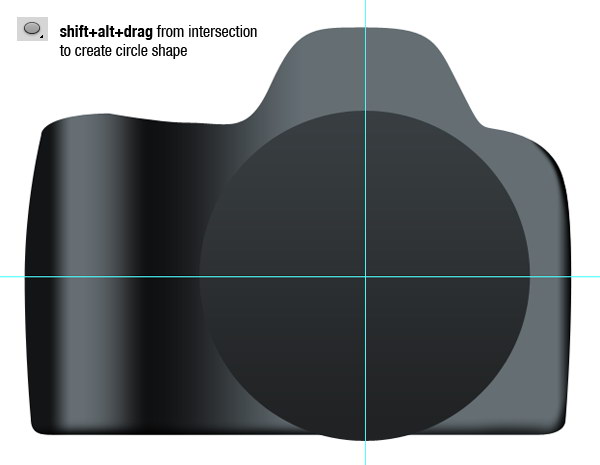
Step 6
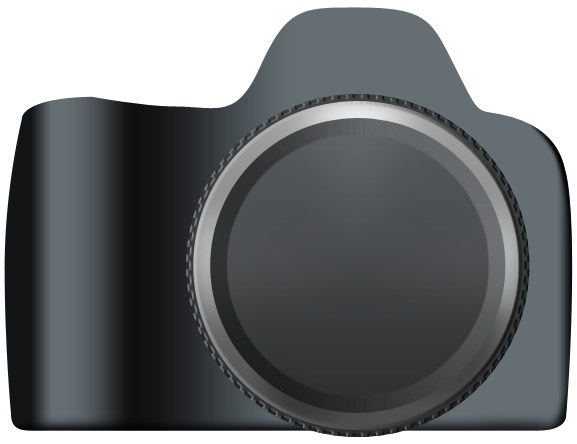
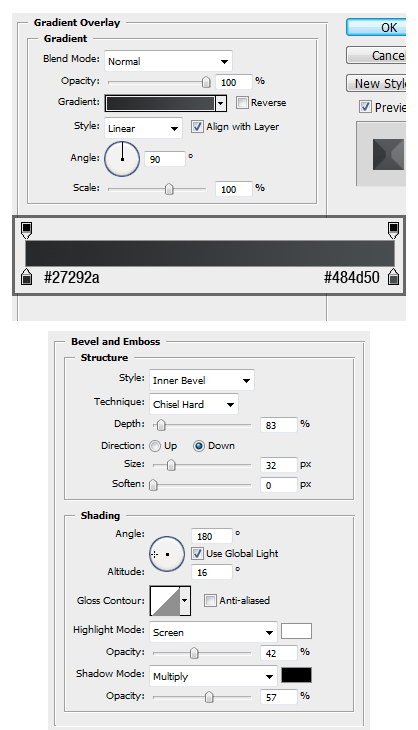
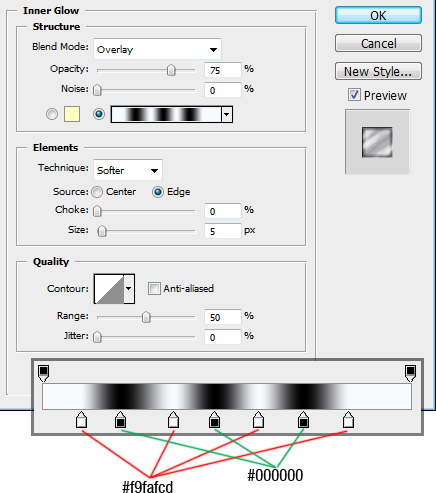
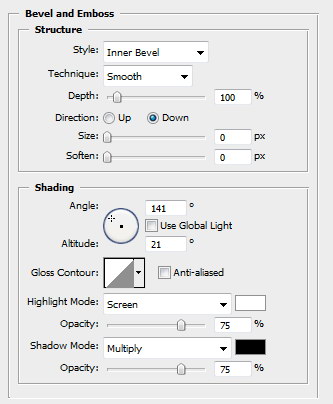
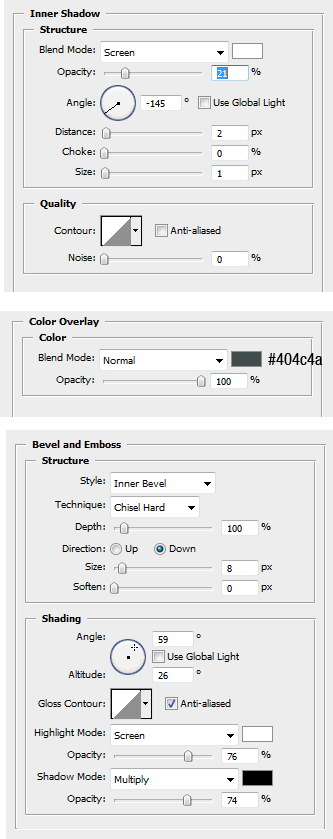
Activate the ellipse tool. While holding Shift and Alt drag from guide’s intersection to create a perfect circle shape. Add these layer styles.
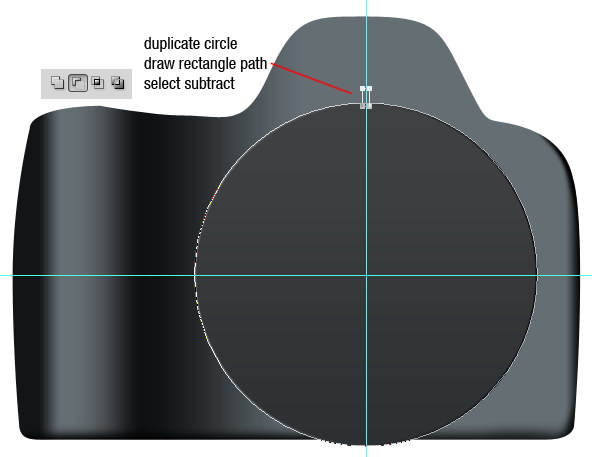
Step 7
Duplicate the circle shape by pressing Cmd + J. Draw a rectangle path touching the top edge of circle and select subtract.
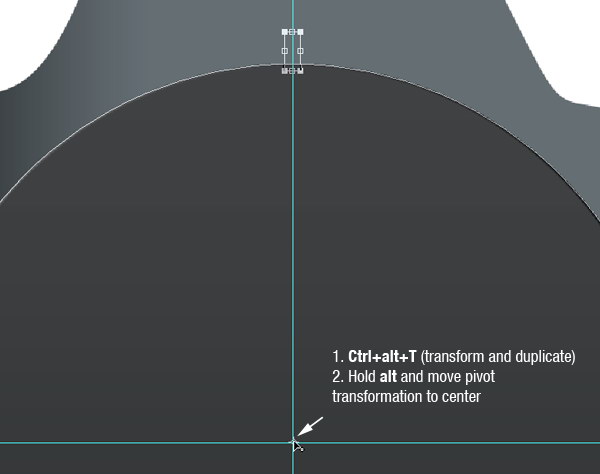
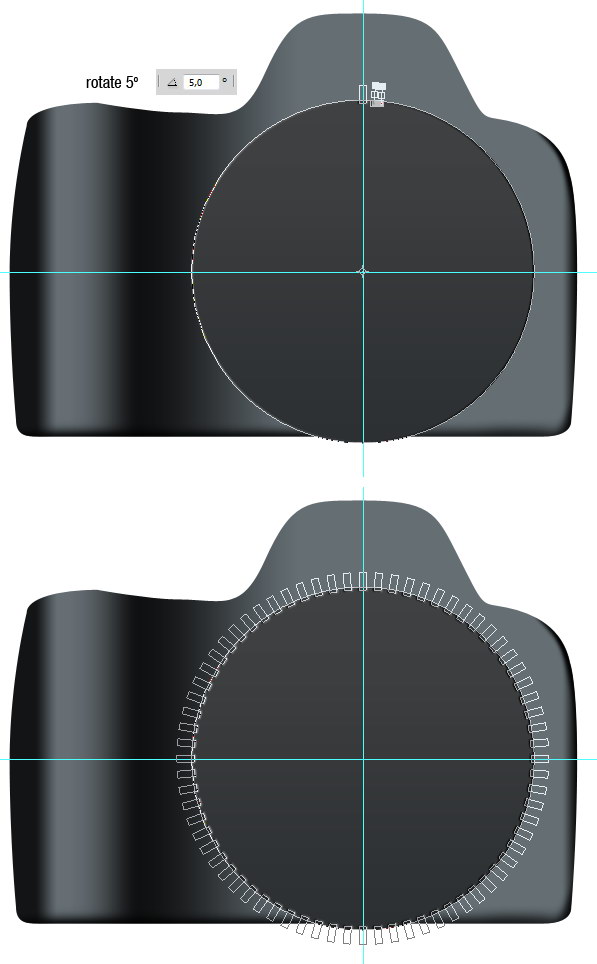
Step 10
Press Cmd + Alt + T to duplicate and transform the selected rectangle path. Hold Alt and move pivot point (small dot in the center of the transformation box) to the guide center. Set rotation to 5 degree. Press Enter to start the transformation. Press Cmd + Alt + T few times until to repeat this transformation. Do this until the rectangles create a full circle.
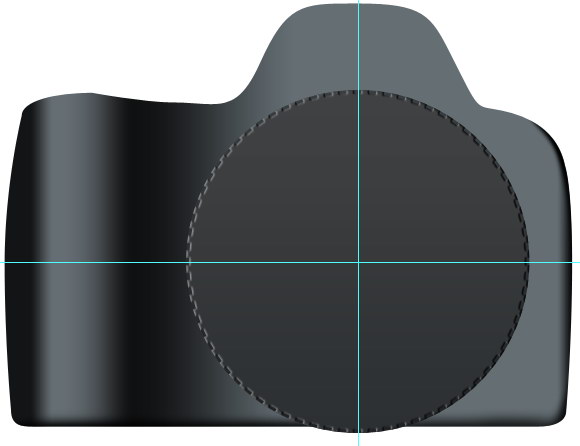
Step 11
Draw a smaller circle shape with the color #a2a2a1 and add these layer styles.
Step 12
Create a new layer. Press Cmd + Alt + G to convert it to a clipping mask. Paint black and white for shadow and highlight using a soft brush. Note: I hid the guide in my example to help you see better.

Step 13
Draw smaller circle shape and add these layer styles.
Step 14
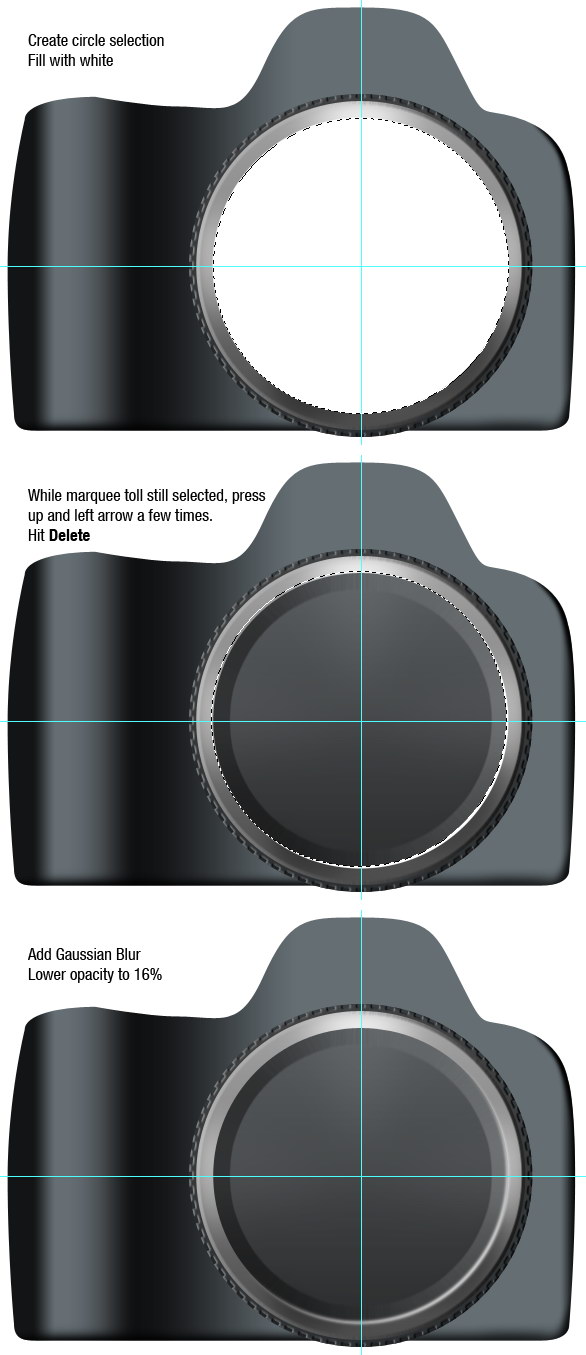
Now, we’ll add subtle highlights. Create a new layer and create a circle selection then fill it with white. Press Up and Left Arrow keys to move the selection a few pixels. Hit Delete. Click Filter > Blur > Gaussian Blur. Change layer opacity to 16%.

Step 15
Create a smaller black circle shape.
Step 16
Again, create a smaller circle shape. Add these layer styles.

Step 17
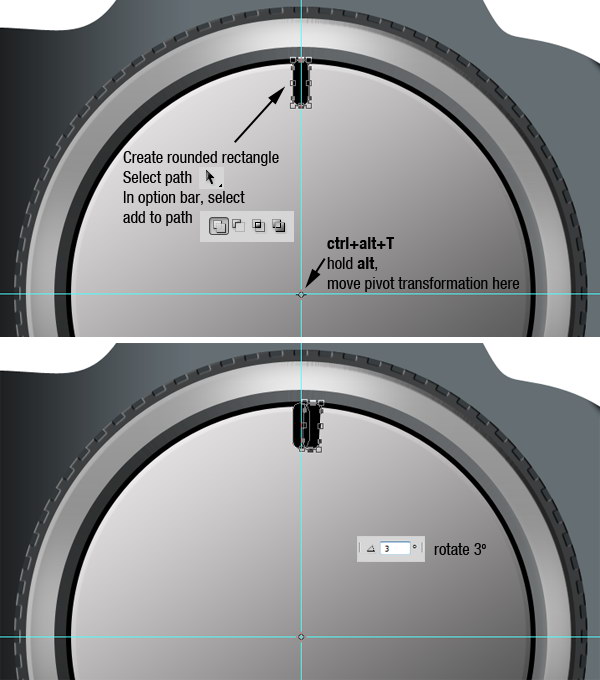
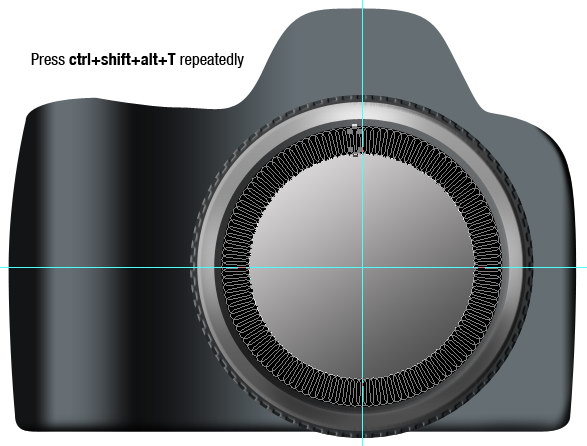
Create a rounded rectangle, place it in the middle of the vertical guide. Select path with path selection tool and choose Add to Path in option bar. Press Cmd + Alt + T, hold Alt and move pivot point to the lens center. In option bar, use rotate size 3 degree.
Press Cmd + Alt + Shift + T repeatedly until the rectangle create full circle.
Step 18
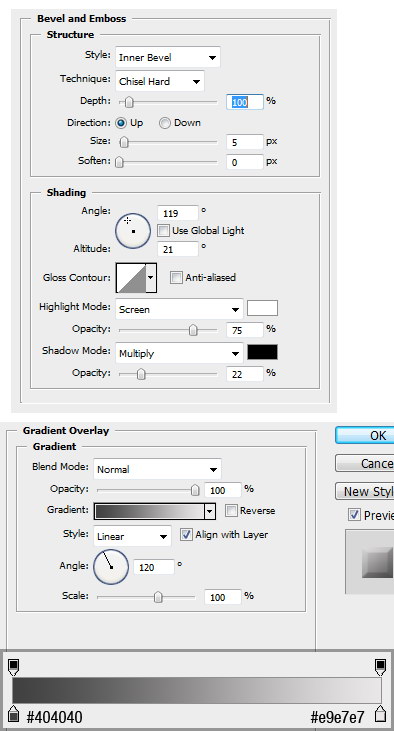
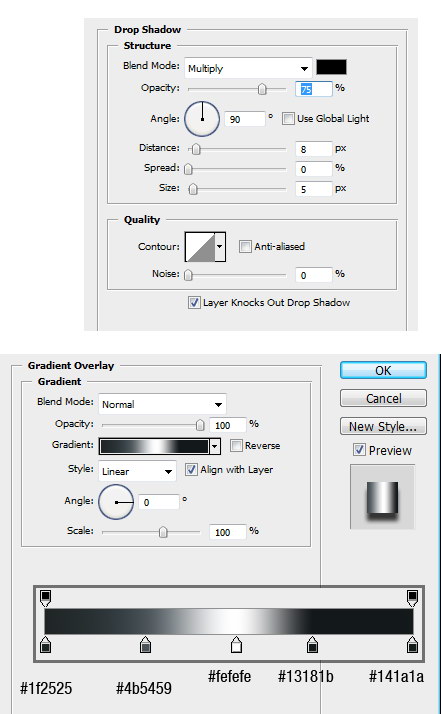
Add these layer styles.
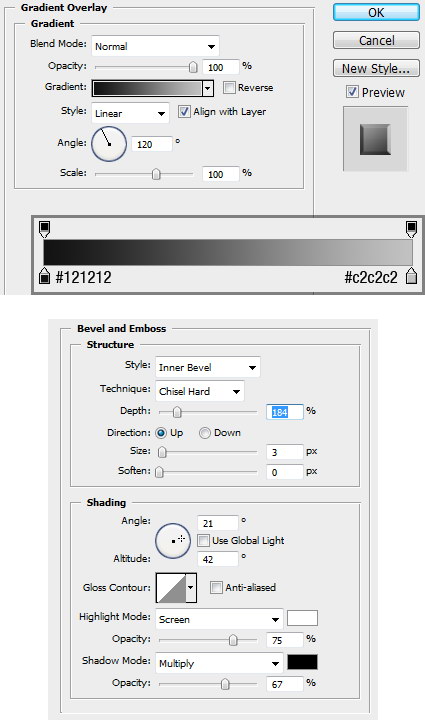
Step 19
Create a circle covering the inner part of previous rectangle. Use #2b3033 for its color. Add these layer styles.
Step 20
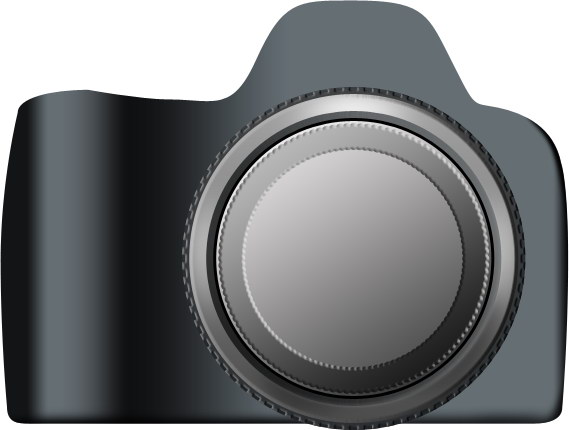
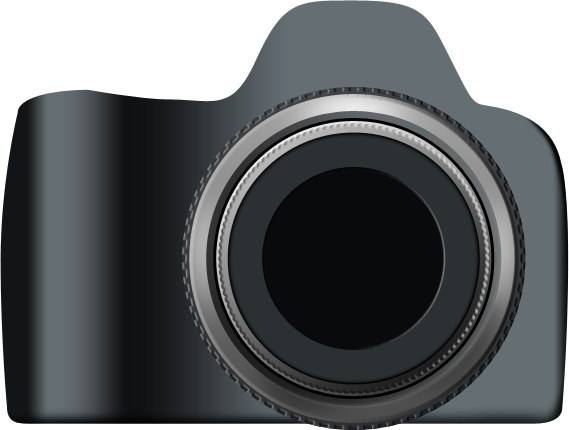
Create a black circle covering the inner part of previous circle. Add these layer styles.
Step 21
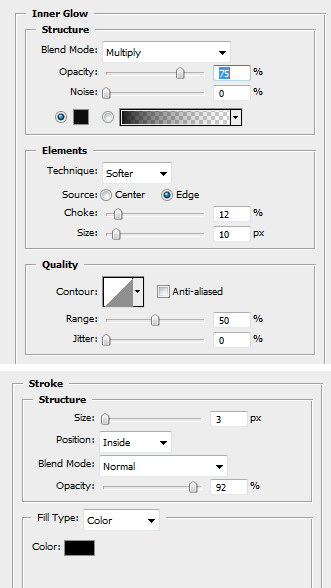
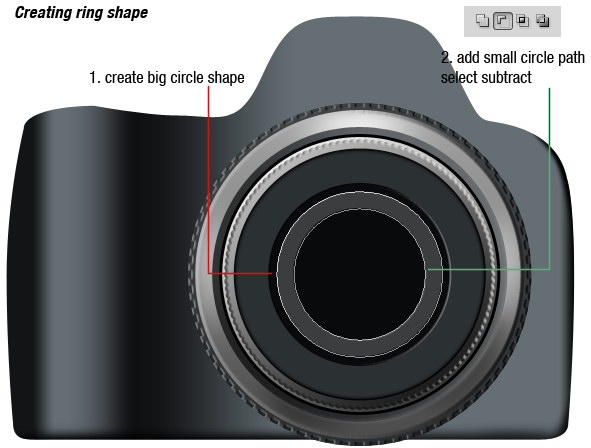
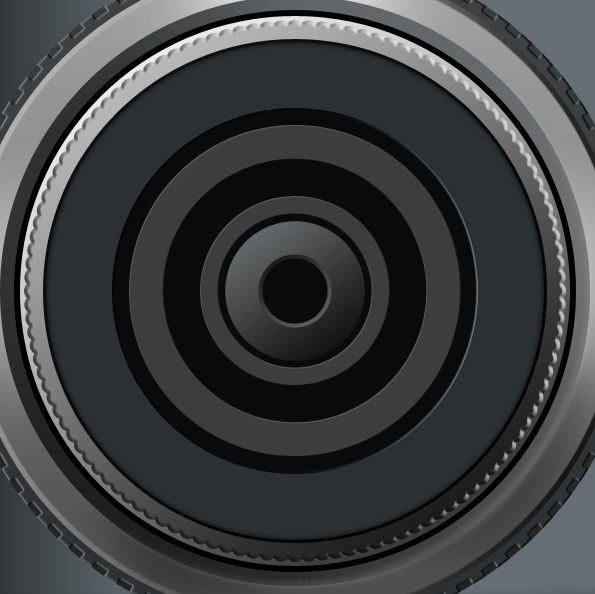
Inside the black circle create a ring shape. To do this, start by creating a circle shape then add another circle inside it. From the option bar select subtract. For its color use #3b3d3e. Add layer styles shown below.
Step 22
Create a smaller ring shape and add the same layer style.

Step 23
Add another ring shape, this time wider and add this layer style.

Step 24
Again, create ring shape, bigger than our last ring shape. Make sure you can see a small part of the previous ring shape. Add this layer style.
Step 25
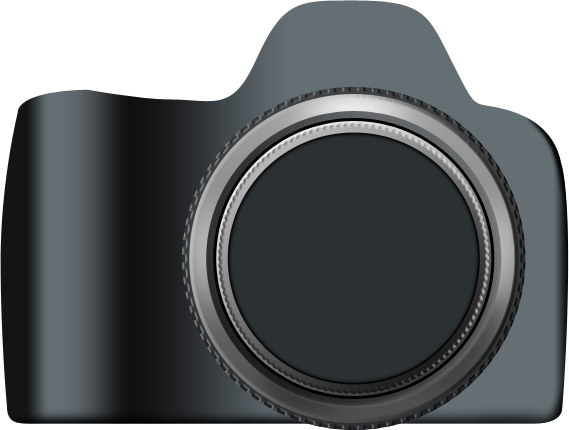
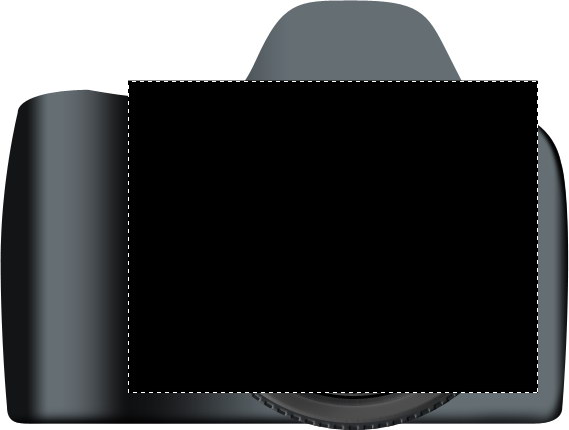
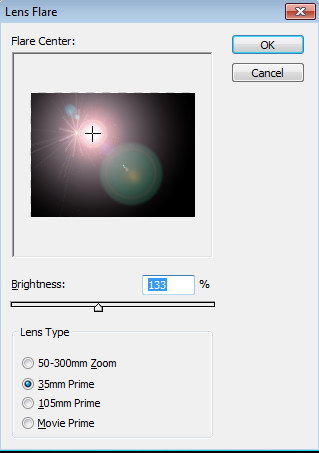
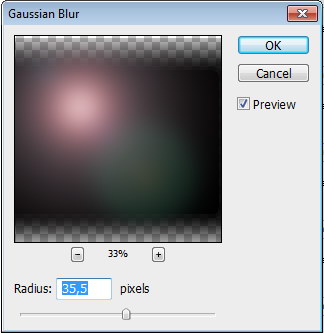
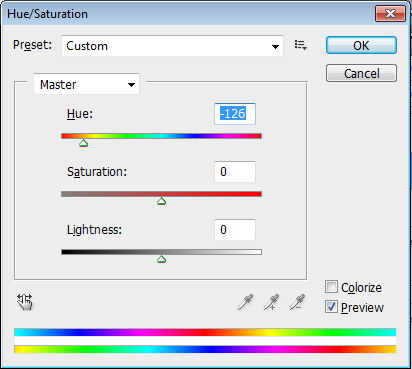
Create a new layer. Create a selection covering the lens and fill it with black. Click Filter > Render > Lens Flare. Click Filter > Blur > Gaussian Blur. Click Image > Adjustments > Hue/Saturation, move Hue slider to change the color.
Create circular selection and click the Add Layer Mask icon. Lower the layer’s opacity to 90%. As you can see, this becomes a glass lens.

Step 26
Create a small black circle shape in the middle of the glass lens.
Step 27
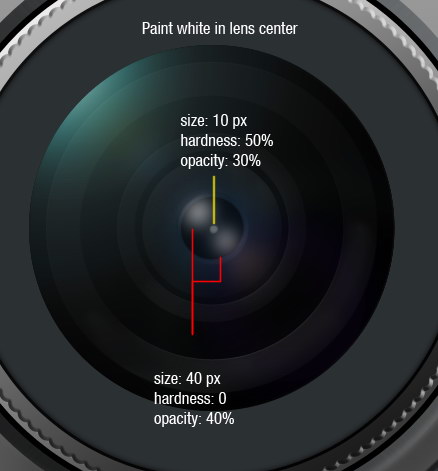
Paint white on the lens center. Use a soft brush with low opacity.
Step 28
Create a small ring shape. Add these layer styles.

Step 27
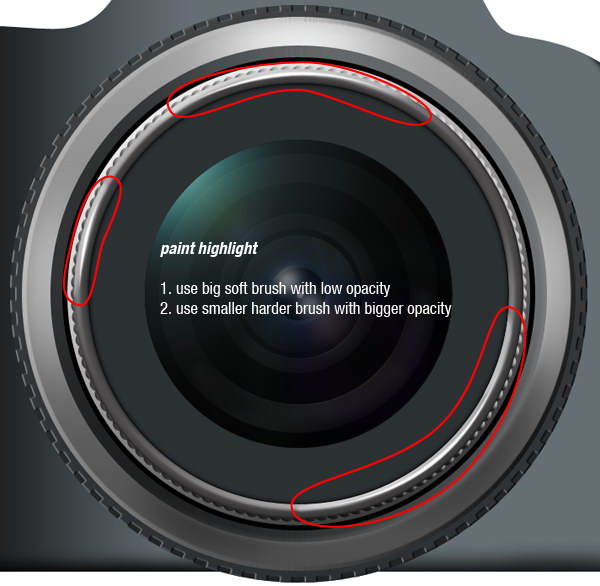
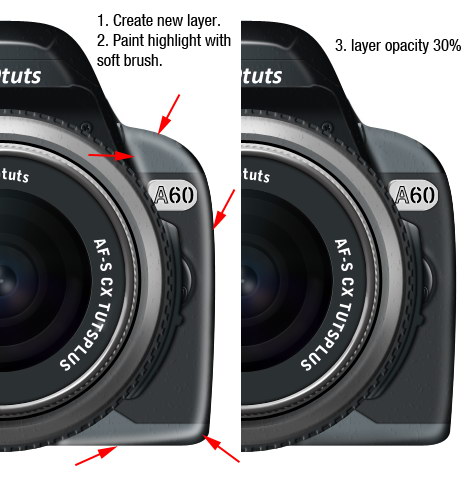
Create a new layer and manually paint highlights on the ring. First, paint with a big soft brush and then paint it again with a smaller hard brush.
Step 28
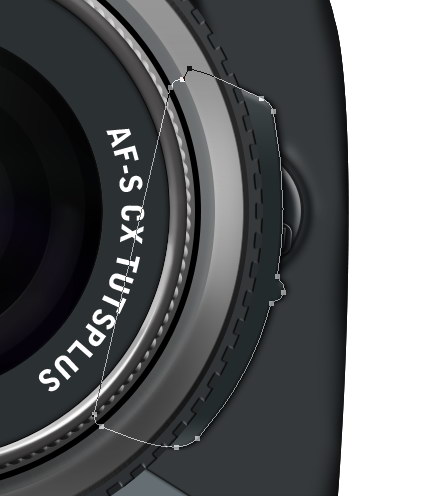
Let’s add the camera’s brand to the lens. Create a circle path. Activate the type tool and click on the path. Remember, you must click on the path not inside the path, otherwise you’ll end up with text inside the path.
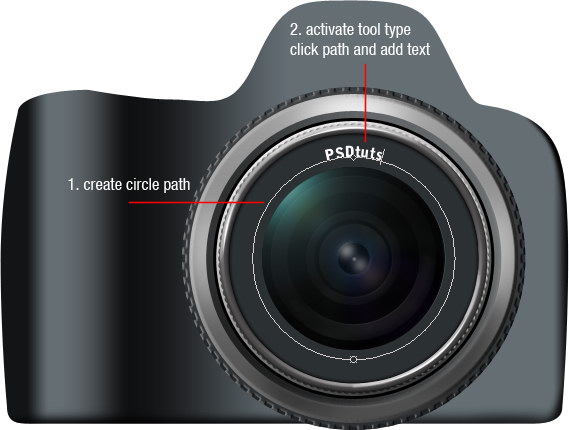
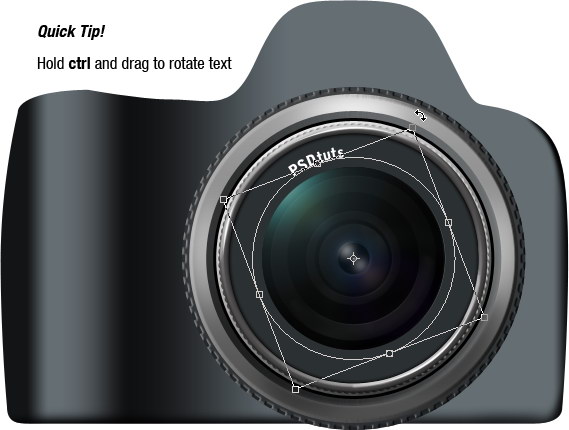
Tip: To adjust the text position, hold Cmd then drag.
Step 29
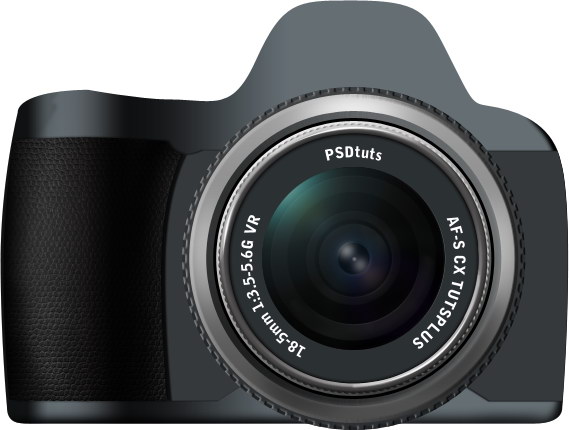
Add other details like lens brand and size.

Step 30
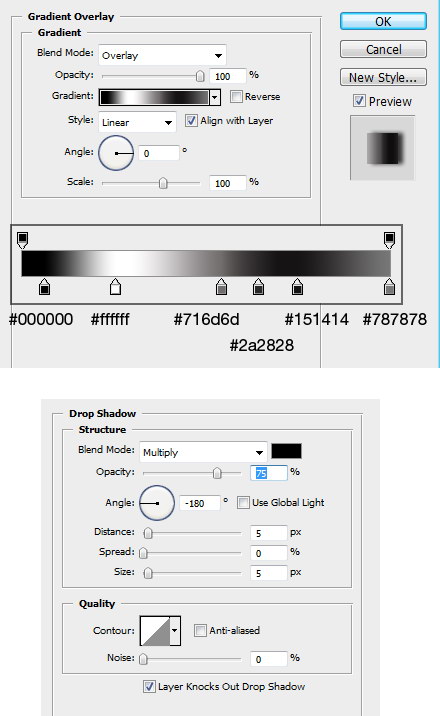
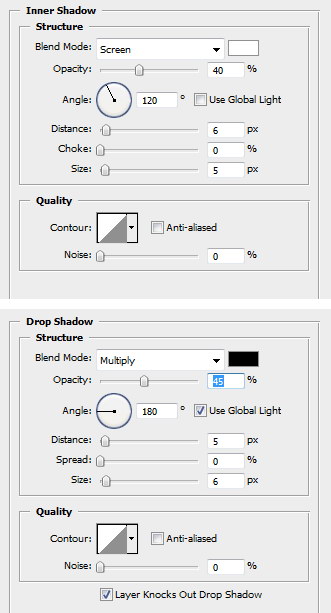
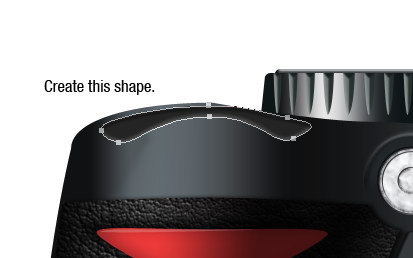
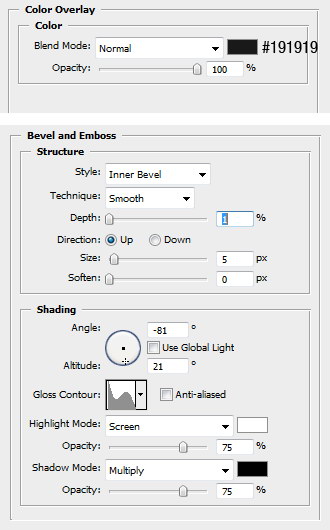
Next, we’ll create the camera’s leather handle. Create this shape. Add layer styles.
Step 31
Add a leather texture using this techniques explained in this quick tip tutorial Create Your Own Leather Texture Using Filters. Hit Cmd + Alt + G to convert it to clipping mask.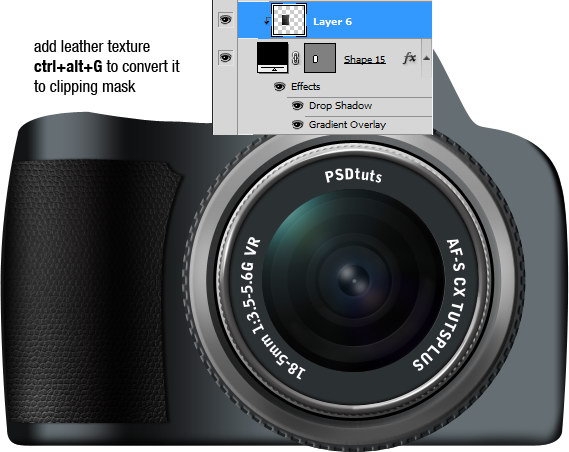
Step 32
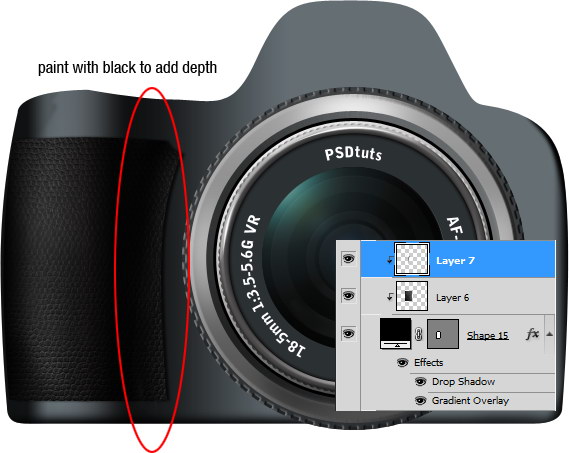
Create a new layer and convert it to a clipping mask again (Cmd + Alt + G). Manually, paint in some black to add depth to leather texture.
Step 33
Create this shape, #35393c. Make sure it’s under the lens. Add layer styles.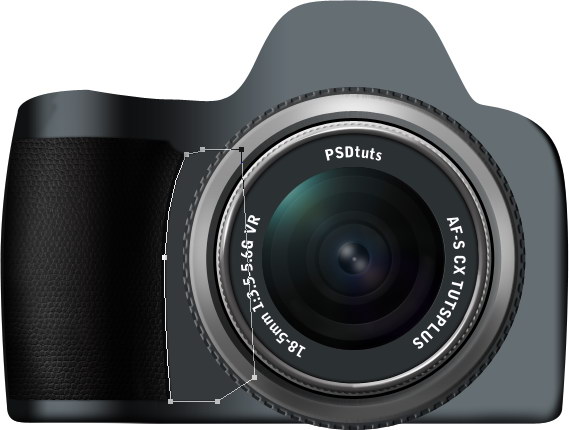

Step 34
Create a similar shape for the opposite side. Use color #35393c with these layer styles.
Step 35
Create a new layer and manually paint some black to add depth to that side.
Step 36
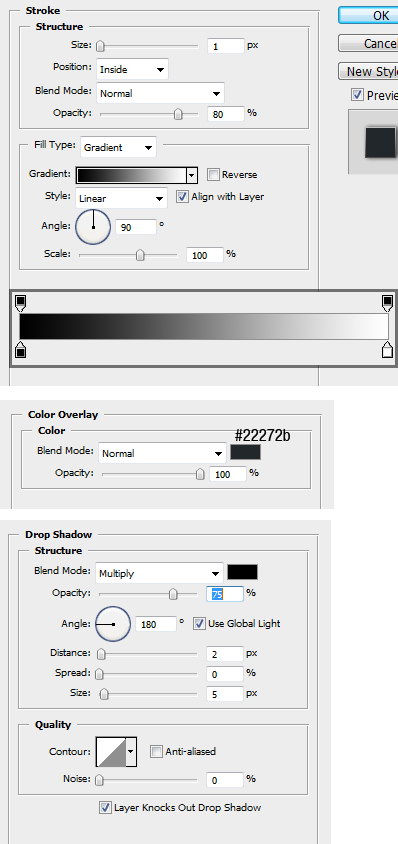
Next, we will be working on the flash. Create this shape, use color #272c2f. Add these layer styles.
Step 37
Create a new layer under the flash and paint some shadow.
Step 38
Create this shape, color #0d0e10. Add these layer styles.

Step 39
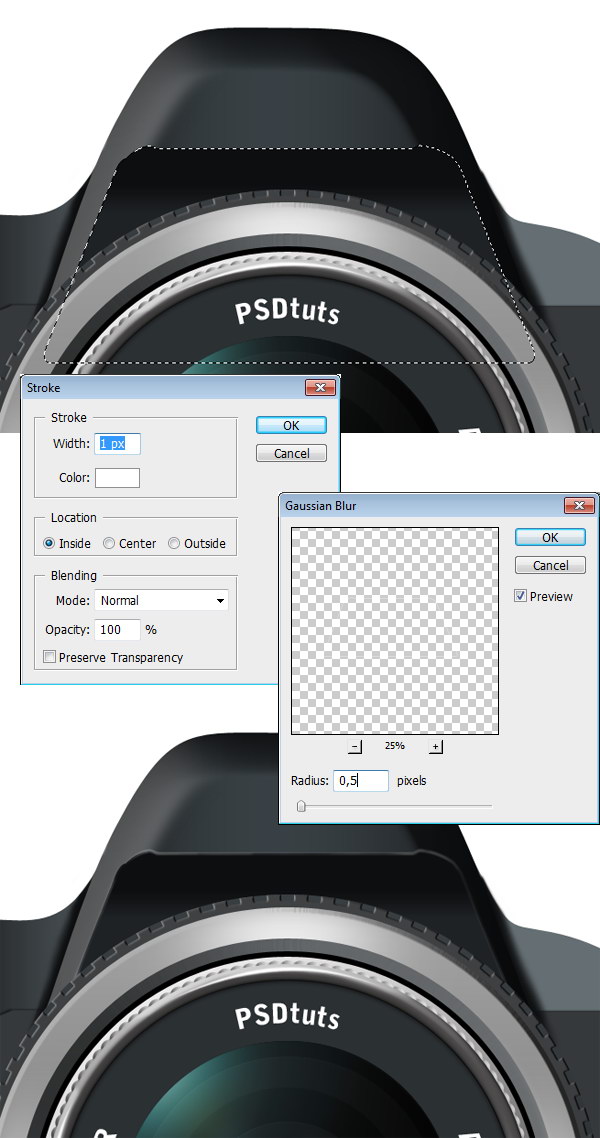
Select the path and hit Cmd + Enter to convert it to selection. Create a new layer. Click Edit > Stroke, choose white with 1 px width. Click Filter > Bur > Gaussian Blur to soften the line.
Step 40
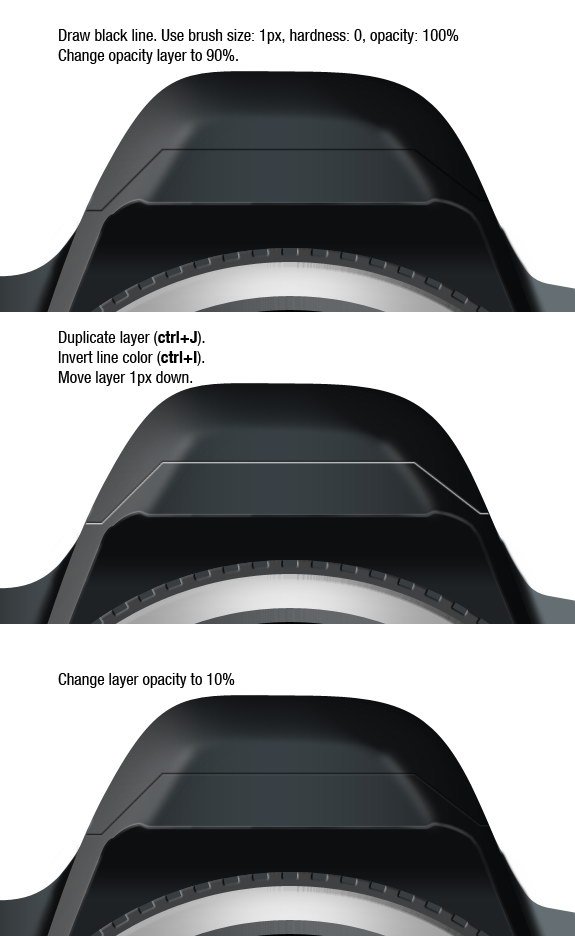
Now, we’ll create an inset line. Create a new layer and paint this line using 1 px brush. Use hardness: 0%, opacity: 100% then change layers opacity to 90%. Duplicate layer (Cmd + J), invert line color (Cmd + I). Move it 1 px down by activating the move tool and press Down Arrow key once. Change its layer opacity to 10%.
Step 41
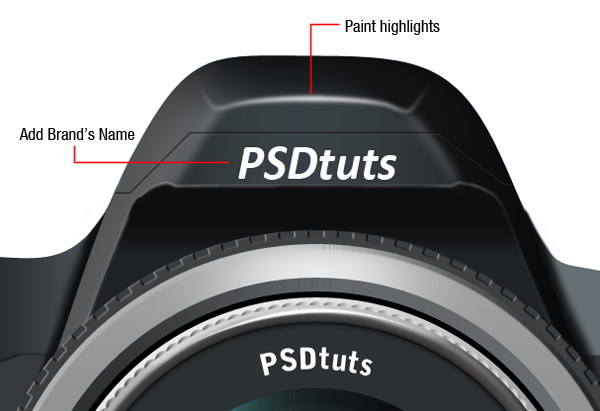
Create a new layer and paint highlights on top of the flash. Also, add brand’s name.
Step 42
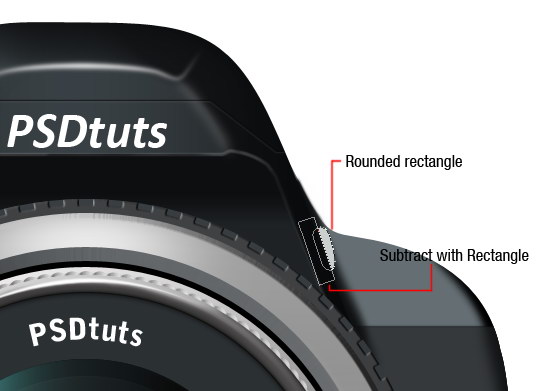
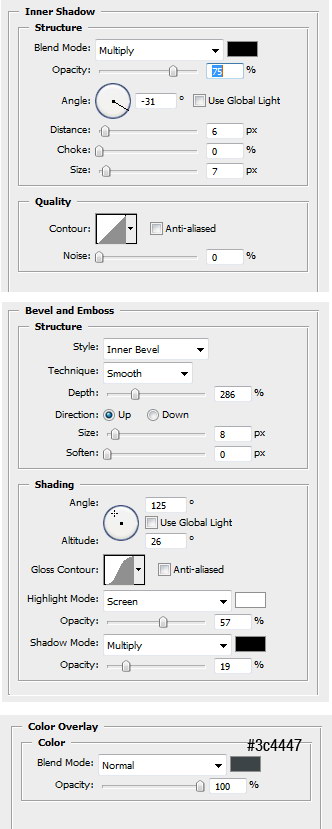
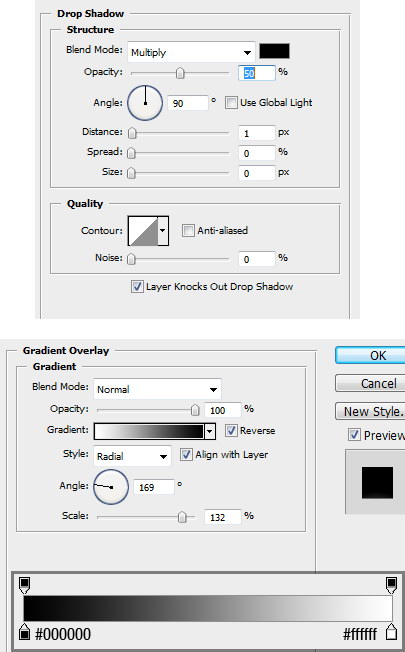
Next to the flash, create a rounded rectangle and subtract it with a rectangle path. Rotate this shape. Add these layer styles.
Step 43
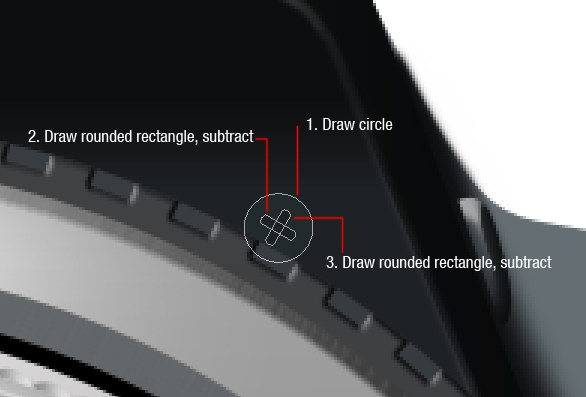
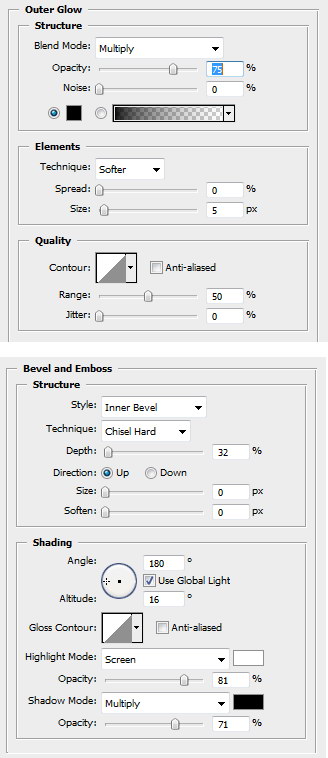
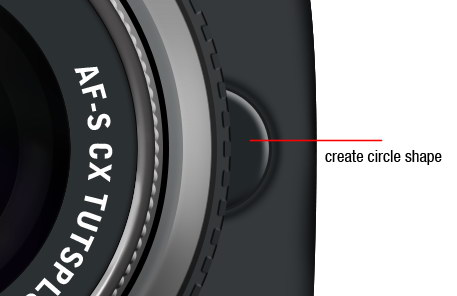
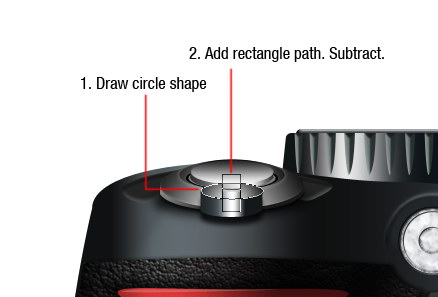
Under the lens, draw a small circle, #222a2c. Subtract it with two crossing rounded rectangles.
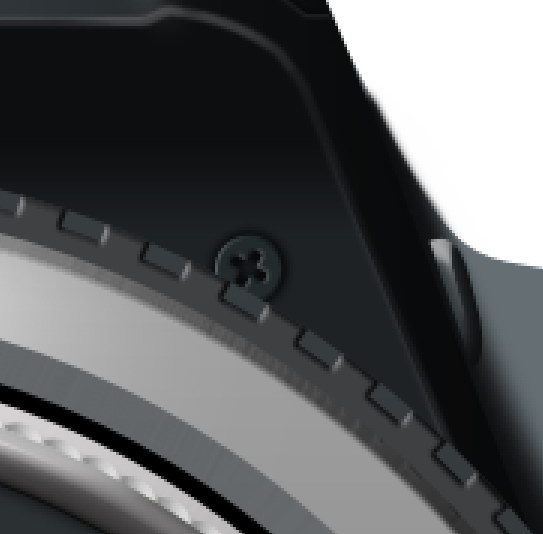
Step 44
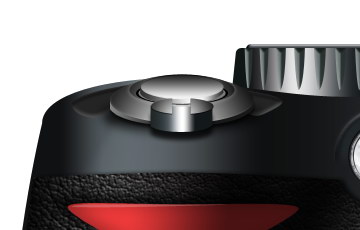
Activate the move tool. Hold Alt and drag the screw to duplicate it. Rotate the new screw a bit to add more realism.
Step 45
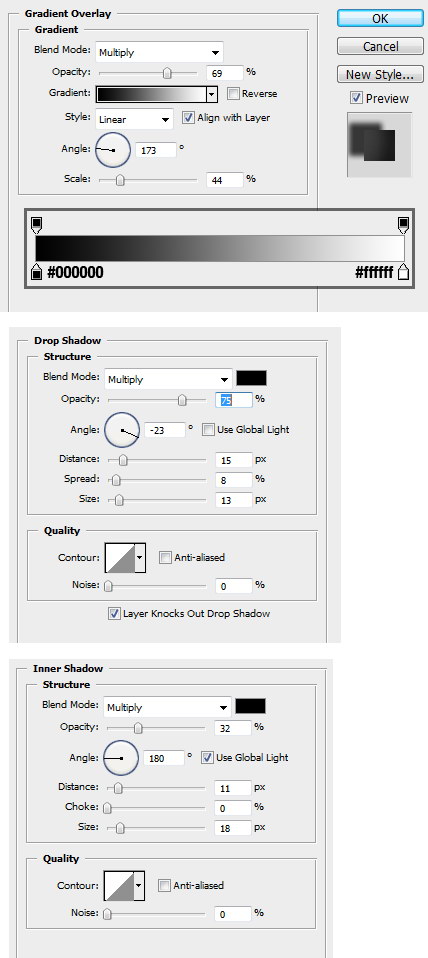
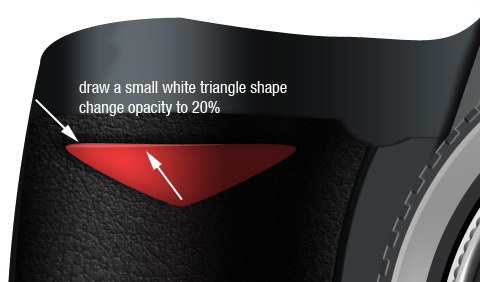
Draw a triangle shape on top of the leather texture, use color #ee3a3a. Add these layer styles.
Step 46
Draw a very small white triangle for its highlight. Change opacity to 20%.
Step 47
Create a small circle under the red triangle, use #202020. Add these layer styles.
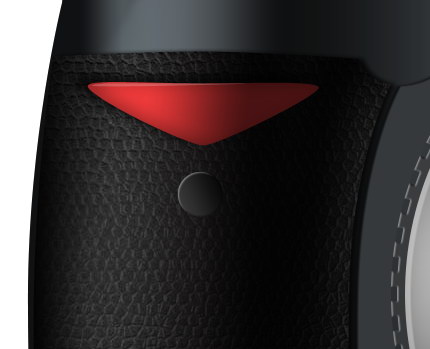
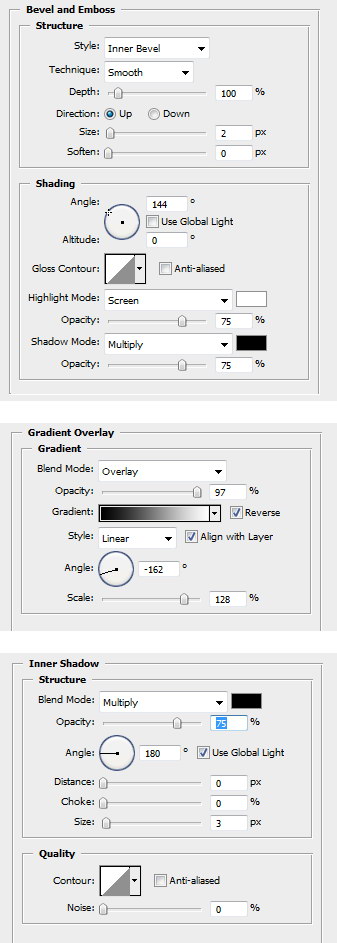
Step 48
Behind the lens, draw a circle shape and add these layer styles.
Step 49
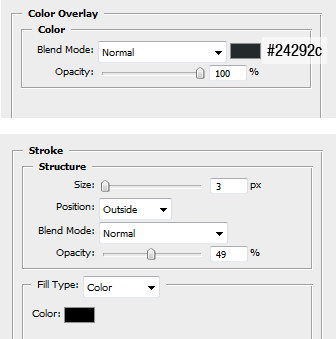
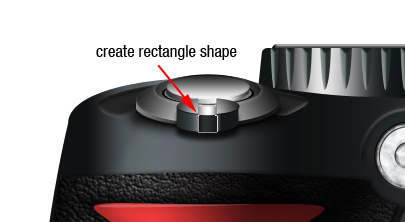
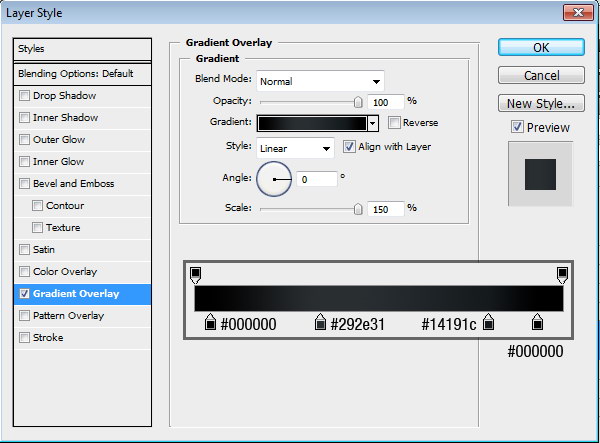
Draw a rounded rectangle on top of the circle. Add these layer styles.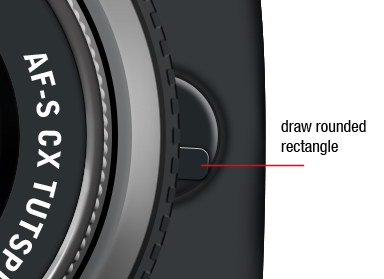
Step 50
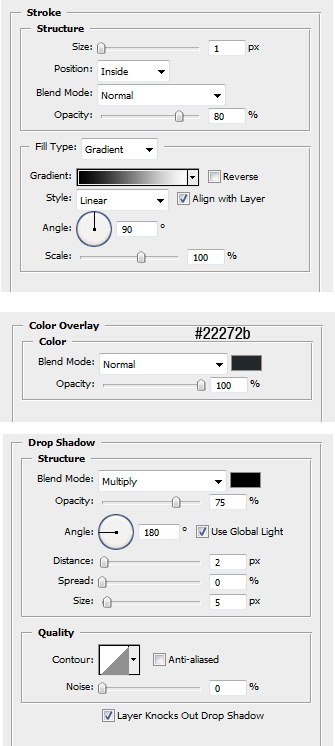
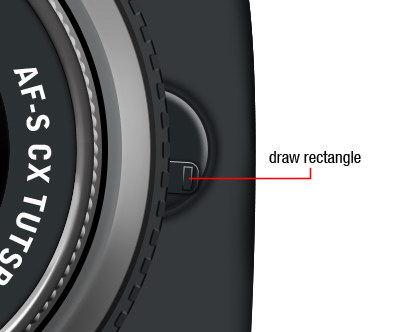
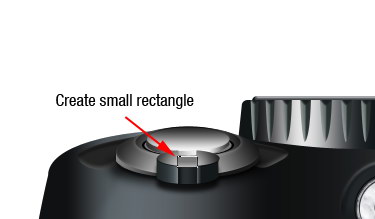
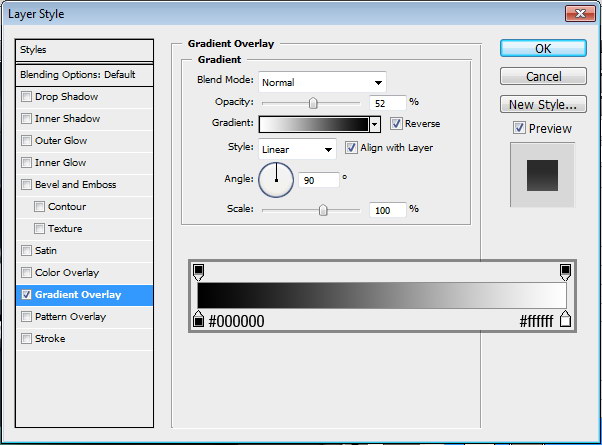
Draw a small rectangle on top of the rounded rectangle. Use the same layer style as in the rounded rectangle.
Step 51
Create this shape, #222a2c. Add these layer styles.
Step 52
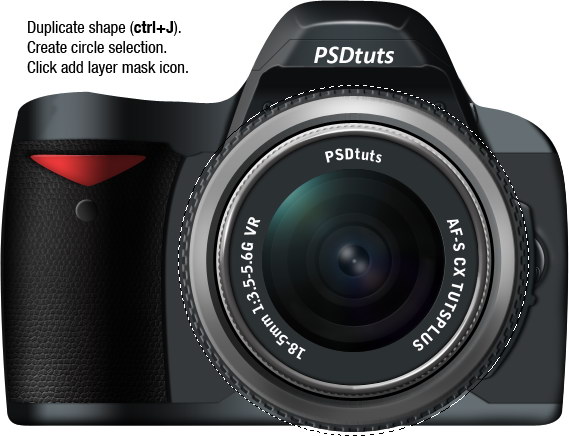
Duplicate shape (Cmd + J). Create circle selection bigger than the lens size then click Add Layer Mask icon in layer palette.
Step 53
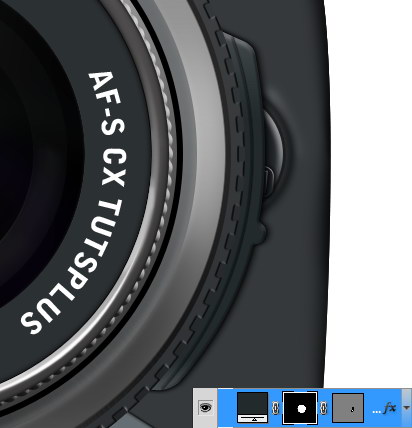
Create a new layer. Paint white on the top part of the shape to add a subtle light cast. Make sure you don’t overdo this by lowering the opacity to 20%.

Step 54
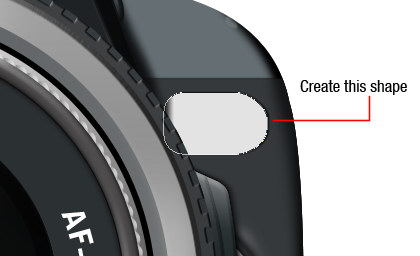
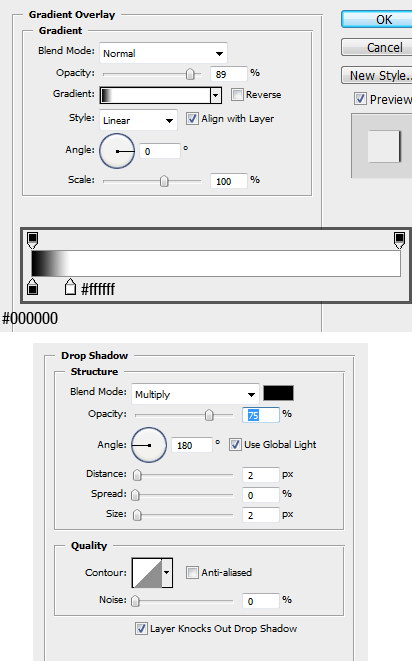
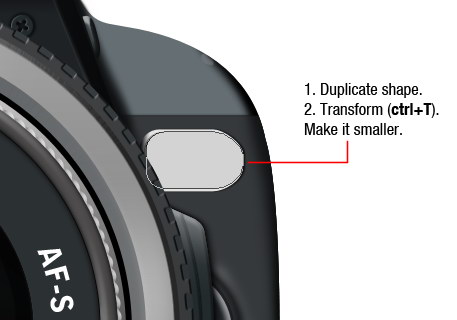
Create this shape. Add these layer styles.
Step 55
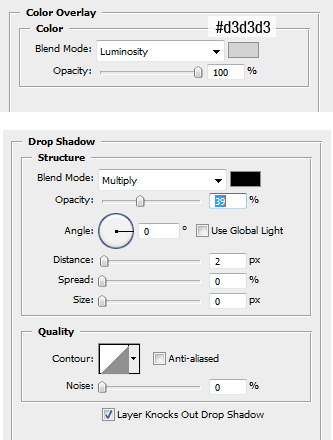
Duplicate shape. Transform (Cmd + T) and make it smaller. Add these layer styles.
Step 56
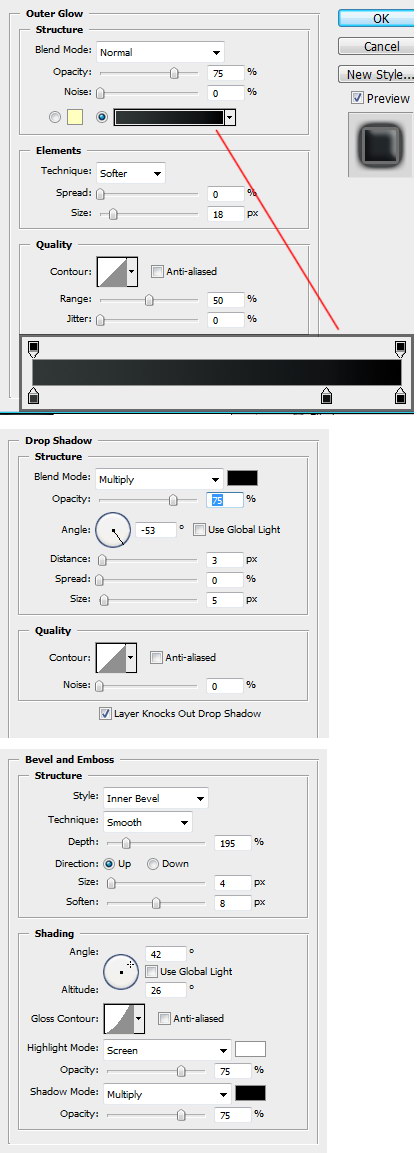
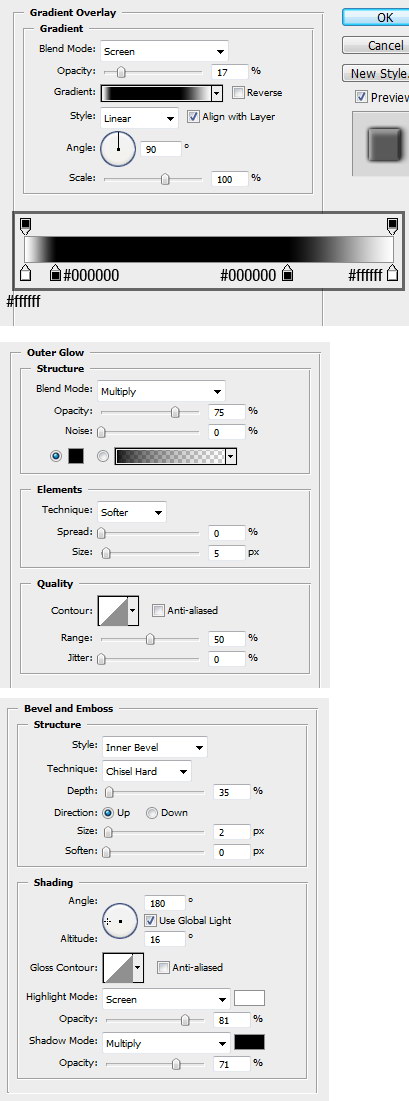
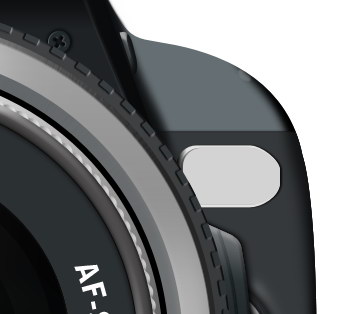
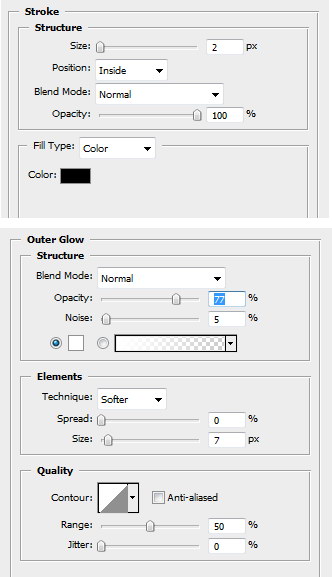
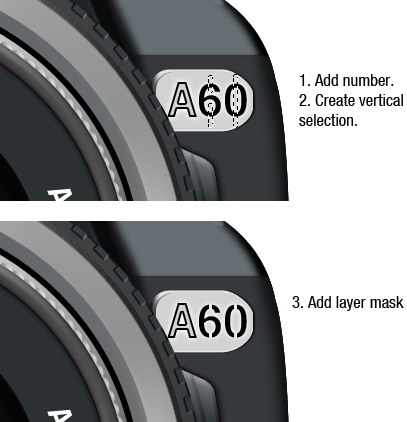
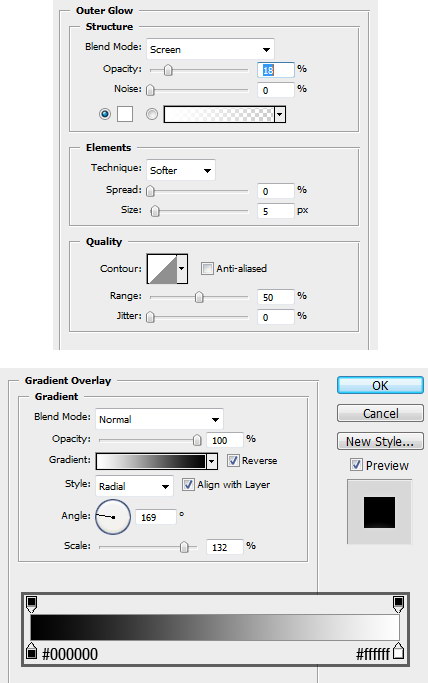
Add a letter. Set fill layer to 0% and add layer styles stroke and outer glow.
Step 57
Add model number. Select middle part of each number then invert selection (Cmd + Shift + I). Click Add Layer Mask icon.
Step 58
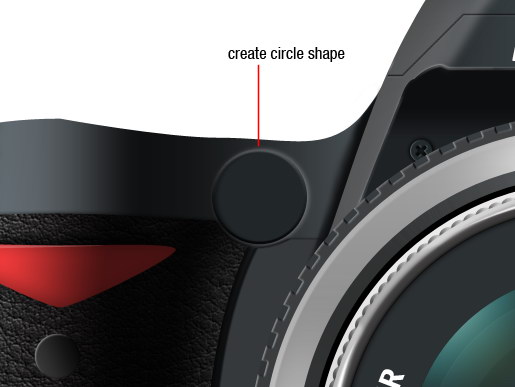
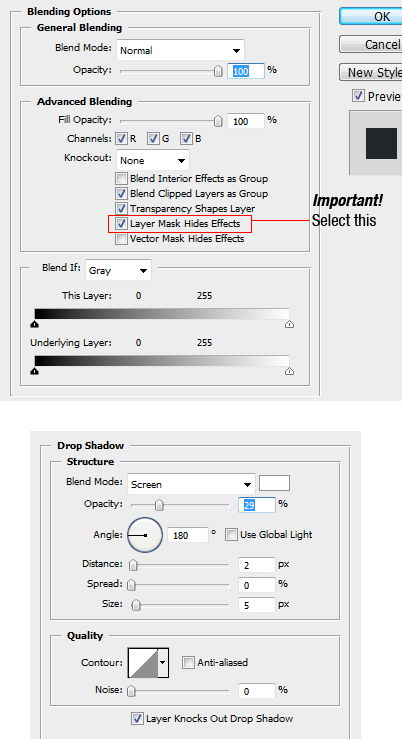
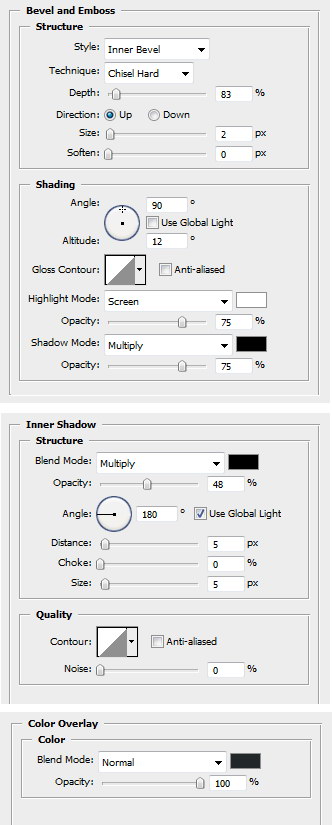
Now let’s work on the AF Assist lamp. Create a circle shape. Double click layer shape to open layer style dialog and make sure you select Layer Mask Hides Effects. For other layer styles use setting below.
Step 59
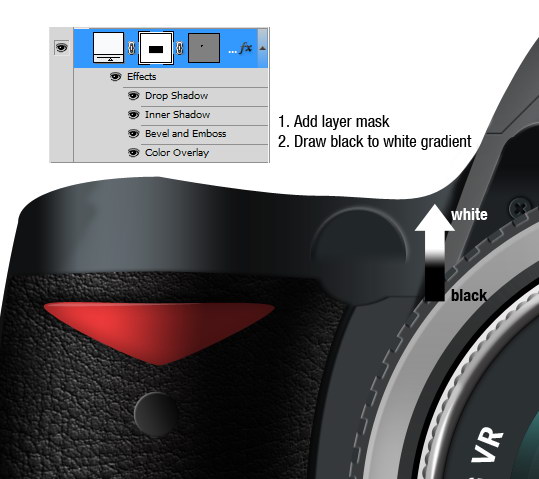
Add layer mask. Activate gradient tool and draw black to white gradient.
Step 60
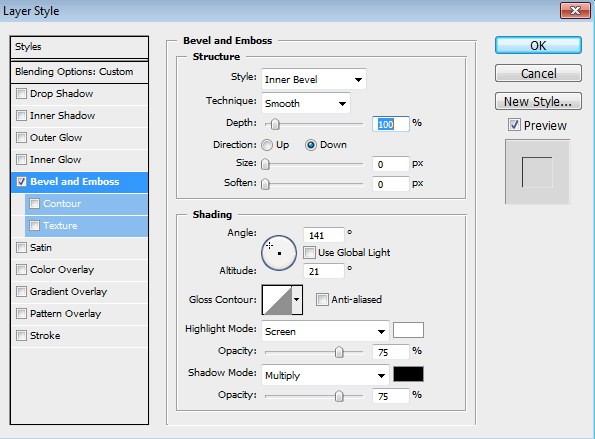
Create a smaller white circle. Set fill layer to 0% and add this layer style.

Step 61
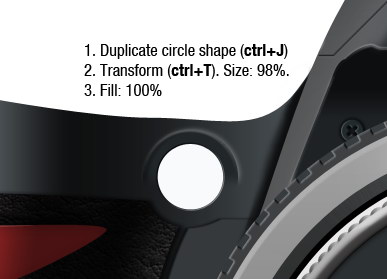
Duplicate circle. Make it smaller by transformation (Cmd + T). Use size: 98%. Change fill layer back to 100%.
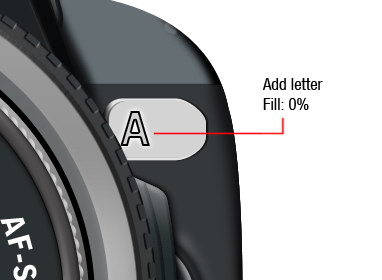
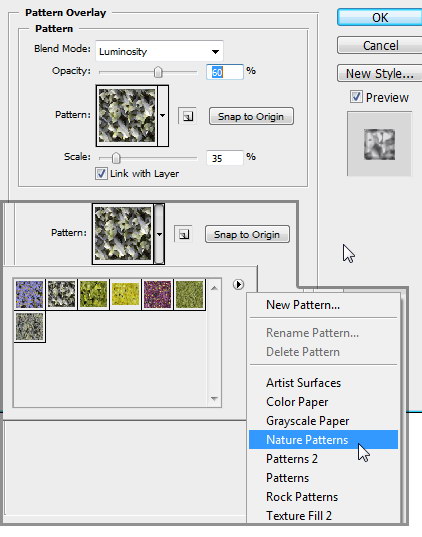
Add these layer styles. In Pattern Overlay setting, load Nature Patterns and choose one of the leaves patterns available. Set blend mode to Luminosity to remove its color.
Step 62
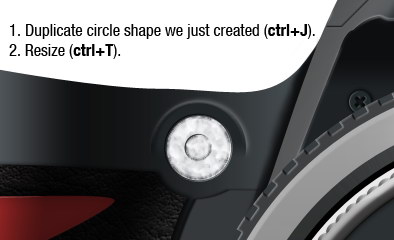
Duplicate the circle shape we just created and make it smaller.
Step 63
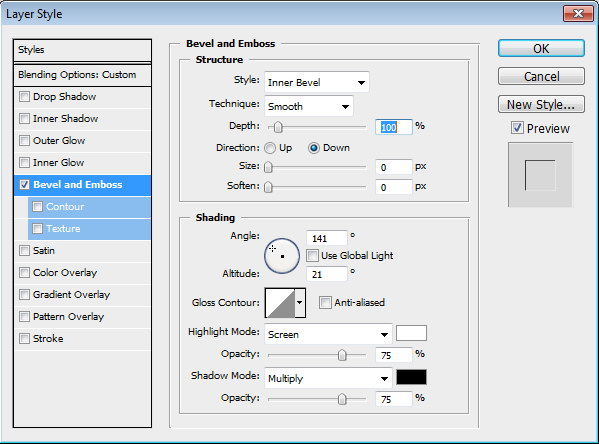
Create a bigger circle shape. Add this layer style. Set Fill to 0%.
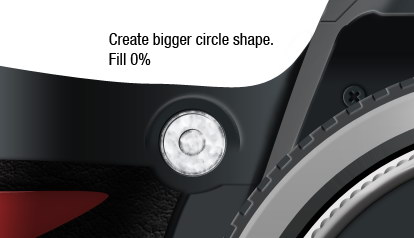
Step 64
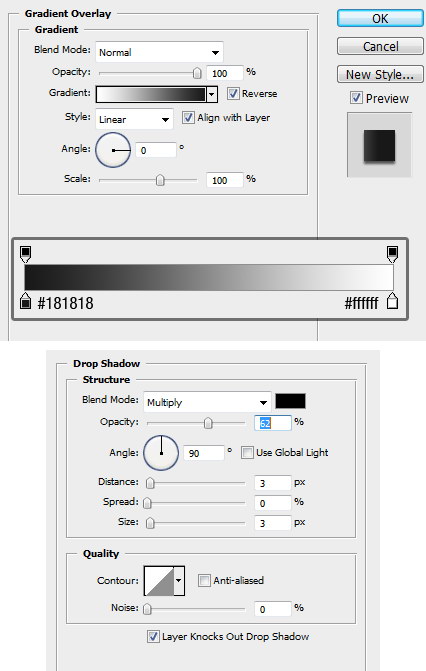
Let’s move on to create the camera’s mode selector. Create a rounded rectangle shape and put it under the camera’s main body. Add these layer styles.
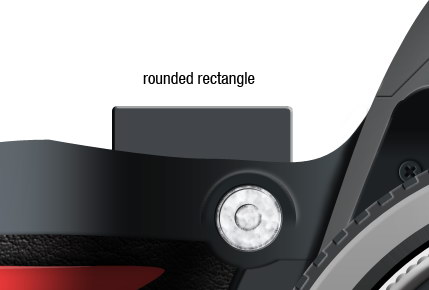
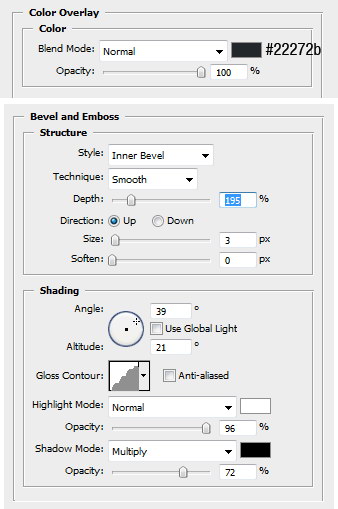
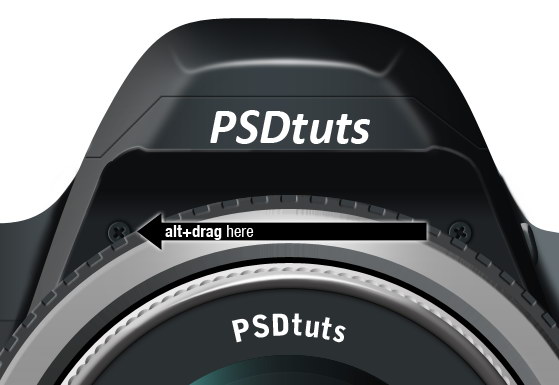
Step 65
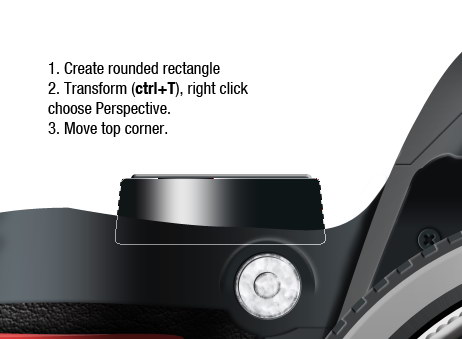
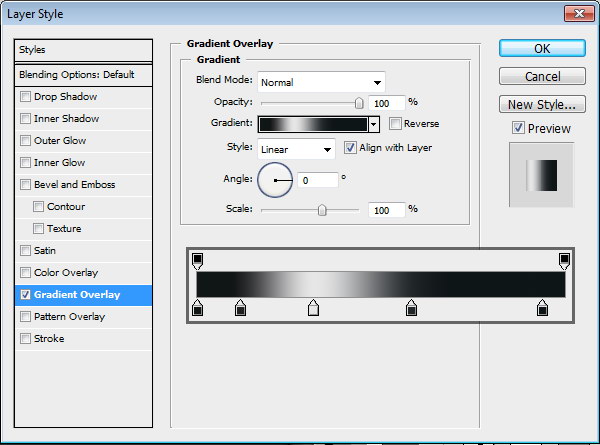
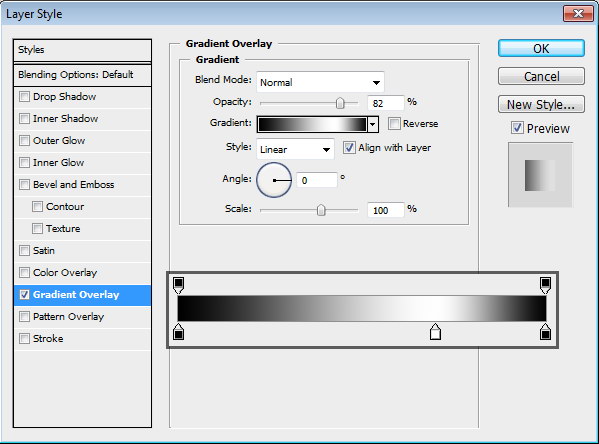
Create another rounded rectangle. Transform (Cmd + T), right click and choose Perspective. Move top corner closer. Add Gradient Overlay.
Step 66
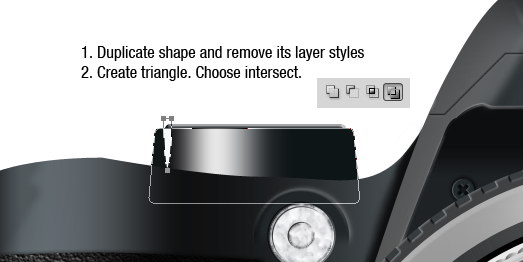
Duplicate the shape we have created, remove its layer style. Create a triangle on top and choose intersect in the option bar.
Step 67
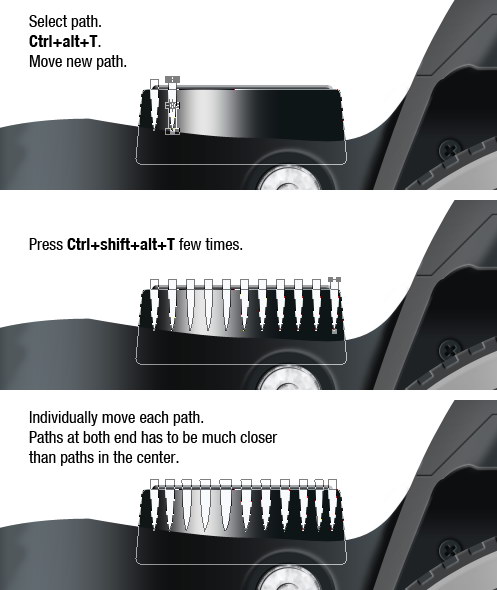
Select the triangle’s path. Press Cmd + Alt + T and move it by pressing Right Arrow a few times. Repeat transformation and duplication by pressing Cmd + Shift + Alt + T repeatedly. Use path selection tool and move each path individually. Arrange the distance of each path to give it a nice perspective.
Add layer styles as shown below.
Step 68
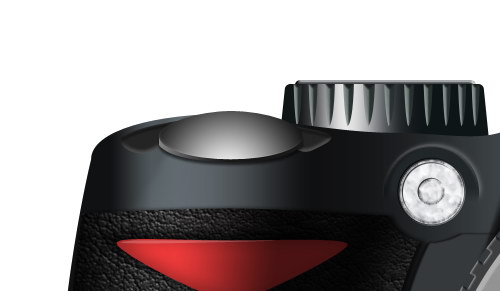
Create a shape as shown below. Place it above the camera. Add these layer styles.
Step 69
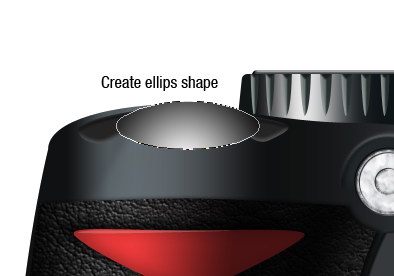
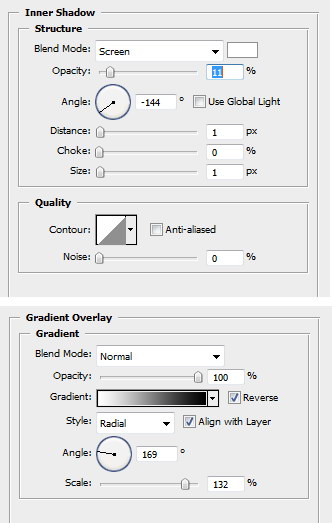
Above the shape create a white ellipse shape. Add these layer styles.
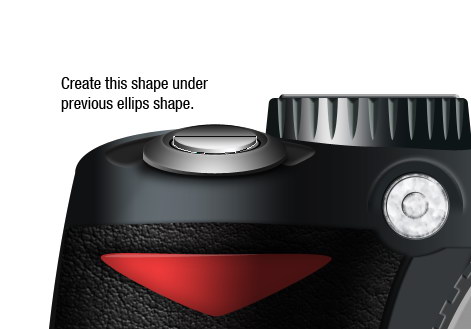
Step 70
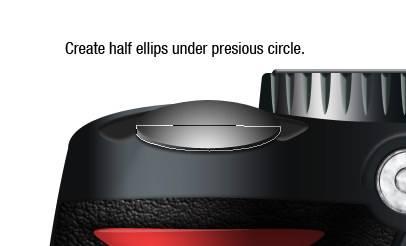
Create half ellipse under previous ellipse. For its color use white. Add these layer styles.
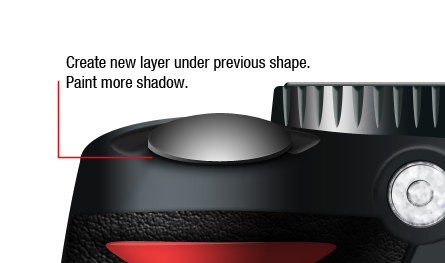
Step 71
Create a new layer under the shape and paint more shadow.
Step 72
Above the big ellipse, create a smaller ellipse. Use white for its color and add these layer styles.

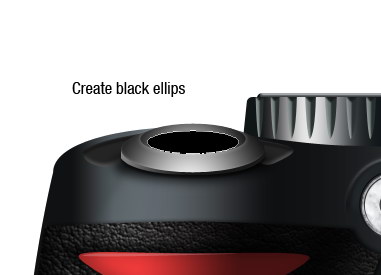
Step 73
Create black ellipse.
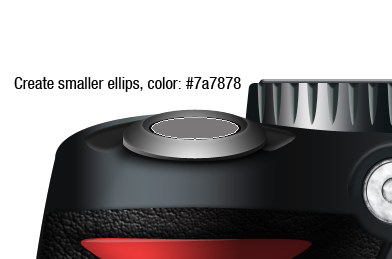
Step 74
Create smaller ellipse.
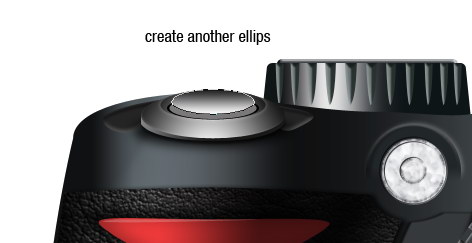
Step 75
Create another ellipse on top.
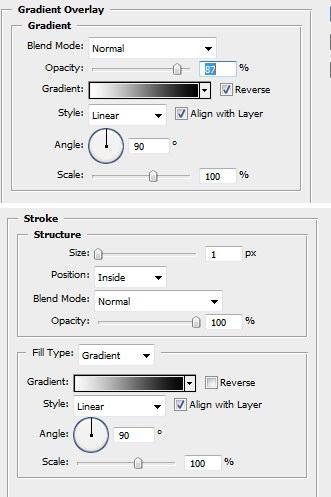
Step 76
Create a half ellipse underneath the previous shape. Add a gradient overlay.
Step 77
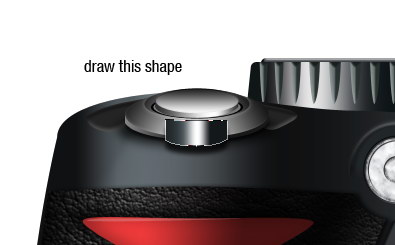
Draw a shape as shown below. Add these layer styles.
Step 78
Draw an ellipse shape. Add a rectangle path in the middle and select subtract to cut it. Add these layer styles.
Step 79
Draw a rectangle. See picture below for its position. Add Gradient Overlay.
Step 80
Draw a small rectangle. See picture below for its position. Add Gradient Overlay.
Step 81
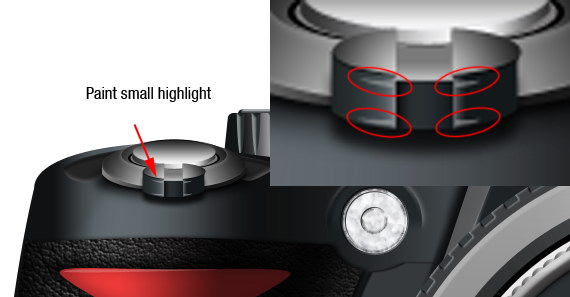
Create a new layer and paint a small highlight.
Step 82
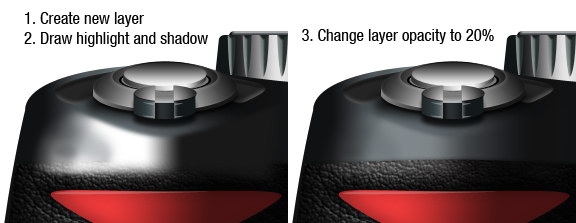
Create a new layer. Draw white and black for highlights and shadows. Make sure the color is fading gradually. Change layer opacity to 20%.
Step 83
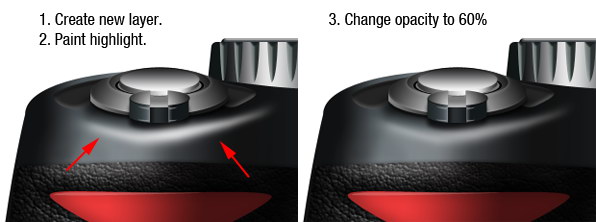
Create a new layer. Paint another highlight. Change the layer’s opacity to 60%.
Step 84
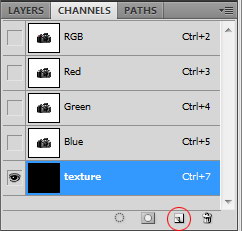
We’re almost done with the camera. The problem is that the camera is too prefect. To give it a more realistic look we need to add some texture. Open channels panel and create new channel.
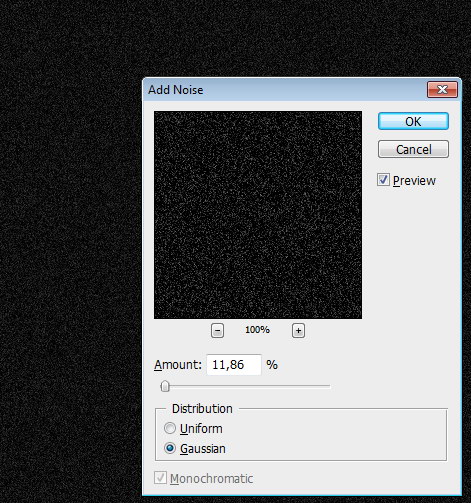
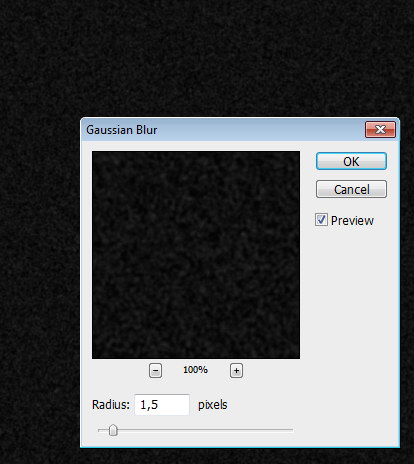
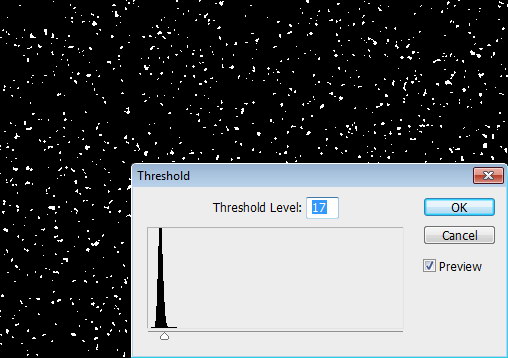
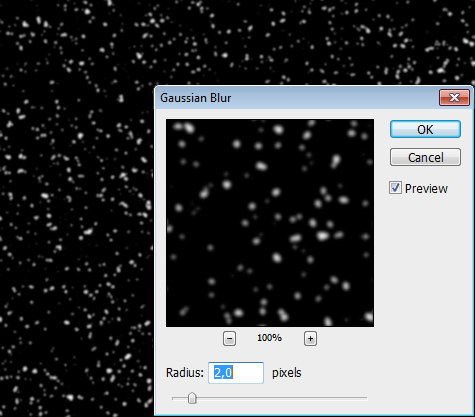
Step 85
Click Filter > Noise > Add Noise. Click Filter > Blur > Gaussian Blur. Click Image > Adjustments > Threshold, move slider until we have a few random shapes. Click Filter > Blur > Gaussian Blur.
Step 86
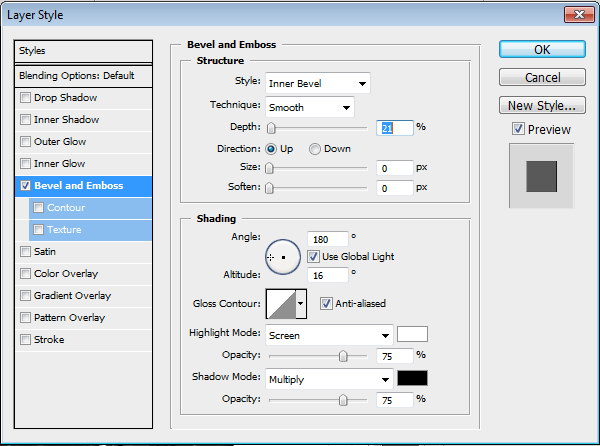
Cmd-click channel to load it as a selection. Create a new layer for our texture. Make sure it is placed above all other layers. Fill selection with white. Add this Bevel and Emboss layer style.
Step 87
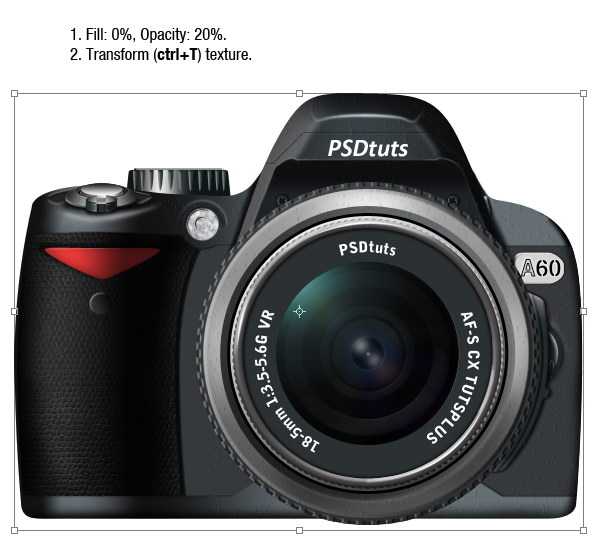
Set fill layer: 0%, opacity: 20%. Transform (Cmd + T) and change its size until you have suitable texture size.
Step 88
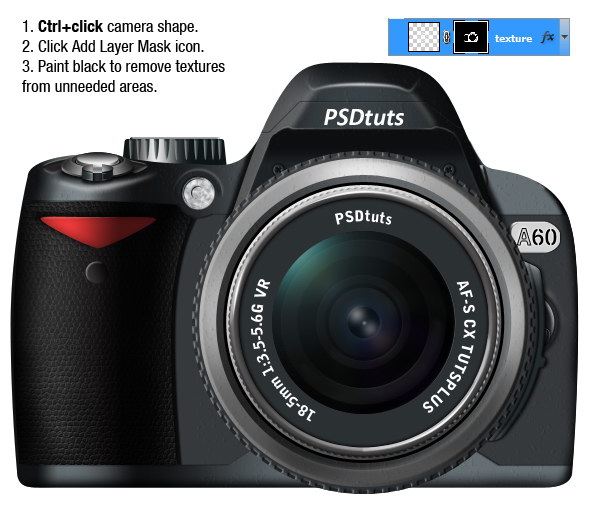
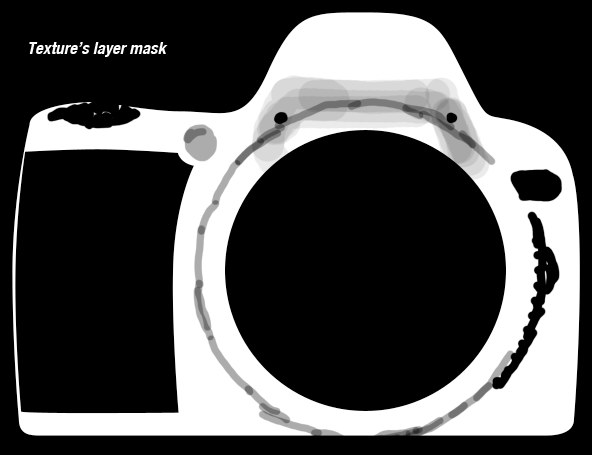
Cmd-click the camera shape and click Add Layer Mask icon. Paint black to remove texture from unneeded areas such as lens and shutter button. You can see layer mask used in this image below.
Step 89
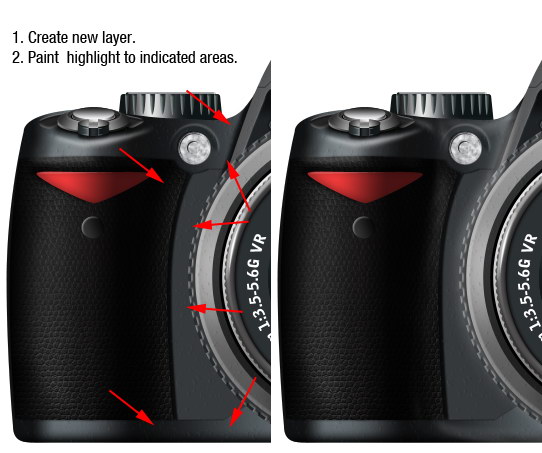
This camera still need more highlights to give it realistic 3D look. So, create new layer and paint some highlights. Lower the layer’s opacity to keep the highlights subtle. Do this for both sides.
Step 90
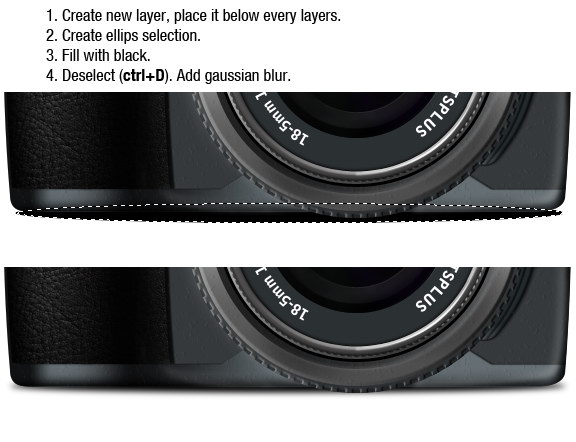
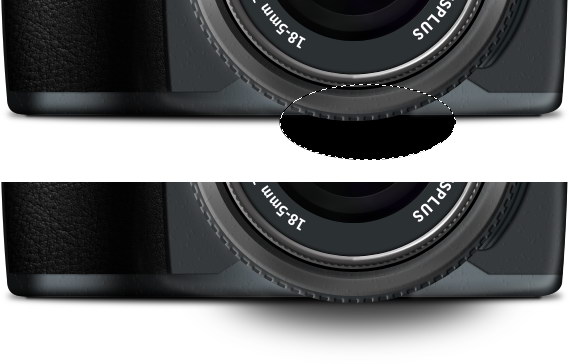
Almost done! Create a new layer and put it deep down under all layers. Create an elliptical selection under the camera and fill it with black. Deselect (Cmd + D) then make it softer with Gaussian Blur filter.
Step 91
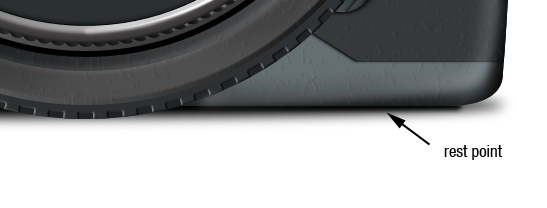
Create a new layer and paint black on the rest point, which is the place where the camera touches the floor. This shadow has to be much darker than the previous shadow.
Step 92
Do the same for the lens shadow. Create a new layer and add an elliptical selection. Fill the selection with black, deselect, and add Gaussian Blur.
Final Image
That’s it! We’re done. What do you think? Is it real enough? I hope you enjoyed this long tutorial and have learned something new. If you have any questions feel free to ask them in the comments below.


